 Previous Page Next Page
When running a web report with parameters, a dialog is displayed for you to specify the parameter values. The runtime parameter dynamically controls your report result. After the report is opened in Web Report Studio, you can change the parameter values in the Parameters panel. You can also use parameter control or parameter form control to change the parameter values for the report.
The Parameters panel is available when the current web report uses parameters. It lists all the parameters used by the report.
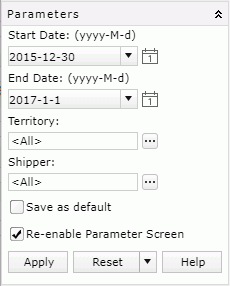
Edit the values according to your requirement and then click Apply to make the report run with the specified parameter values.
The way to specify a parameter value varies according to the type and properties of the parameter. Here are several ways you can use to specify parameter values:
 to specify multiple values if the parameter allows for multiple values.
 to specify a date and time value.
Note: You are recommended not to use blank as the thousands separator in Number-typed parameter values under French locale, otherwise your input will not be correctly recognized because of a JVM bug. For details, see http://bugs.sun.com/view_bug.do;jsessionid=c8cdaf911b20fffffffffd9fc6340b30d670?bug_id=4510618.
Below shows the usages about the other options in the panel:
This option is not available when Enable Hiding Initial Parameter Dialog For Web Report is unchecked in the server profile.
The Save as default and Re-enable Parameter Screen options are user-report level settings, that is to say, they take effect when both the same user and report are matched. This also applies to admin users, and therefore admin users cannot customize the settings for all users.
For a parameter that allows for multiple values (the parameter's Allow Multiple Values property is true), you can specify one or more values to it.
in the value text box of the parameter. The Enter Values dialog appears.
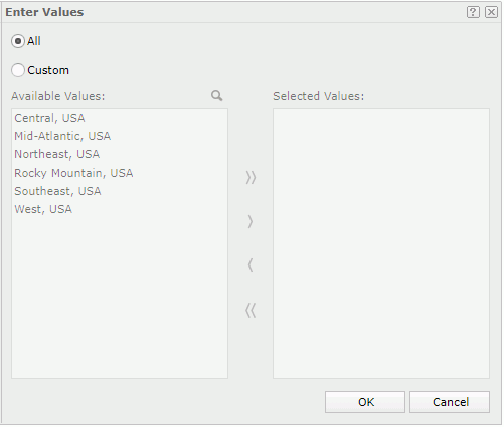
 to add them to the Selected Values box; to add all the available values, click
  . You can make use of the Search button
  to search for the required values among the available values: click the button to display the search text box, type in the keyword
and the available values that contain the keyword will be listed with the keyword highlighted in the values.
to search for the required values among the available values: click the button to display the search text box, type in the keyword
and the available values that contain the keyword will be listed with the keyword highlighted in the values.
If some added values are not wanted, select them in the Selected Values box and click  to remove them; to remove all added values, click
  .
.
 , type in a value in the displayed text box, then press Enter to add it to the Selected Values box. When the parameter is bound with a column, but the display column is different from the bound column, make sure the value you enter is that of the bound column. After finishing adding the values manually, click
  in the text box to close it. If the parameter is of the Date, Time or DateTime type, you can also click the calendar button to specify a date and time value.