 Previous Page Next Page
Specifying multiple values for a parameter
Setting values for Date/Time/DateTime parameters
When running or scheduling reports with parameters, you need to specify values for the parameters. The way to specify a parameter value varies according to the type and properties of the parameter. Here are several ways you can use to specify parameter values:
 to specify multiple values if the parameter allows for multiple values.
  to specify a date and time value.
Note: You are recommended not to use blank as the thousands separator in Number-typed parameter values under French locale, otherwise your input will not be correctly recognized because of a JVM bug. For details, see http://bugs.sun.com/view_bug.do;jsessionid=c8cdaf911b20fffffffffd9fc6340b30d670?bug_id=4510618.
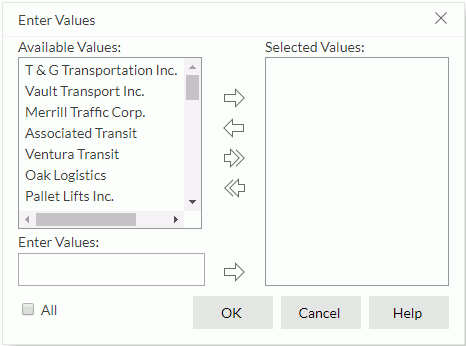
For a parameter that allows for multiple values (the parameter's Allow Multiple Values property is true), you can specify one or more values to it.
next to the value text box of the parameter. The Enter Values dialog appears.

 to add them to the Selected Values box; to add all the available values, click
  . You can make use of the Search text box to
search for the required values among the available values: type in the keyword
and the available values that contain the keyword will be listed with the keyword highlighted in the values.
. You can make use of the Search text box to
search for the required values among the available values: type in the keyword
and the available values that contain the keyword will be listed with the keyword highlighted in the values.
If some added values are not wanted, select them in the Selected Values box and click  to remove them; to remove all added values, click
  .
.
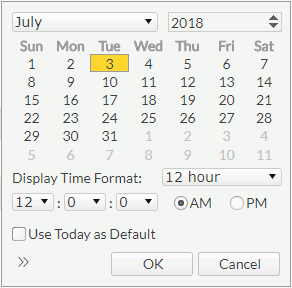
next to add it to the Selected Values box. When the parameter is bound with a column, but the display column is different from the bound column, make sure the value you enter is that of the bound column. If the parameter is of the Date, Time or DateTime type, you can also click the calendar button to specify a date and time value.
When specifying value for a parameter of the Date, Time or DateTime type which allows for type-in values (the parameter's Allow Type-in of Value property is true), you can make use of the calendar to select a date and time as the value, or customize a dynamic date and time value by creating an expression using JReport's built-in Date/Time functions. For example you might want the start date to always be 7 days ago and the end date to be today, you can then customize the value for the start date parameter as dateadd('d', -7, today()) and today() for the end date parameter. The expression has higher priority than the value specified using the calendar.
To select a date and time value from the calendar:
next to the value text box of the parameter. The following dialog appears.

In the calendar specify the month, year and day accordingly.
To customize a dynamic date and time value by creating an expression:
next to the value text box of the parameter. The following dialog appears (if the right section of the dialog is not displayed,
click >> on the bottom left corner to expand it).
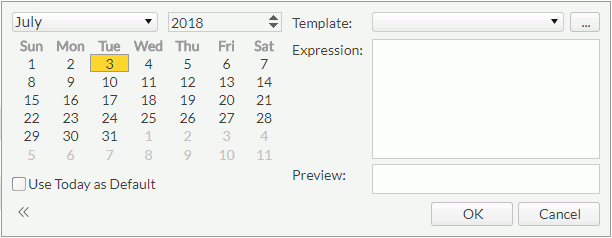
 next to the Template drop-down list to access the function list, and then click the required function to insert it in the Expression text box.
After you use an expression to specify the value, when you hover the mouse pointer over this value, a tip will appear showing its expression. Click on the value, the expression will be displayed in the value text box. You can edit the expression in the text box directly if you want. After editing, when you click elsewhere outside of the value text box:
When running reports via URLs, you can also use expressions to specify date and time parameter values. The format is
Parameter_Name={"exp":"Complete_Expression_String", "SelectedDate":"'MM/dd/yyyy"}. If the expression does not contain the function SelectedDate(), there is no need to add this part - "SelectedDate":"'MM/dd/yyyy" and the format is Parameter_Name={"exp":"Complete_Expression_String"}. For example, to specify p_EndDate=today(), write it as p_EndDate={"exp":"today()"}. The following is an example:
http://localhost:8888/jinfonet/runReport.jsp?jrs.cmd=jrs.web_vw&jrs.catalog=%2fSampleReports%2fSampleReports.cat&jrs.report=%2fSampleReports%2fABC.cls&jrs.param$P_StartDate=01/01/2016&jrs.param$p_EndDate={"exp":"today()"}&jrs.result_type=8
JReport Server allows you to pre-customize the default parameter values for a report before running it.
 on the floating toolbar.
The Parameter Settings dialog is then displayed.

The Save as default option is an action and takes effect after the task is submitted. Its initial status is always unchecked.
The Save as default and Re-enable Parameter Screen options in the dialog are user-report level settings, that is to say, they take effect when both the same user and report are matched. This also applies to admin users, and therefore admin users cannot customize the settings for all users.
Note: If you just edit the parameter values in the dialog and click OK, the new values will be meaningless. Only when you check Save as default and click OK, can the values be saved as default values to the report.
When specifying parameter values for reports, you may want to save the specified parameter values for reuse next time. JReport provides two ways of saving. One is users decide when and which parameter values to save, the other is JReport saves each applied or submitted parameter values automatically. When the saved number in either way reaches the maximum, the oldest record will be removed. The number is calculated on a user-report basis. Take a report with two parameters for an example, supposing the maximum number is set to 3. Each user can save at most three groups of parameter values for the report, with each group containing the values of the two parameters.
To switch on the function of saving parameter values, you need to configure the server profile: check the Yes checkbox for the option Enable Saving Parameter Values, select a way to do the saving: Manually or Automatically, and then specify a maximum number to limit the saved value groups via the option Maximum Number of Auto Complete Parameters List for each user-report pair.
Manually saving parameter values
When you have chosen to manually save parameter values, the Use Saved Values button  will be available at the upper right corner of the parameter page. By clicking this button, you will get the following:
 next to the value list.
  Save Values. The saved group will then be added into the value list.
Using automatically saved parameter values
When you have chosen to automatically save parameter values, each time a user submits a group of parameter values to a report, the group is saved by JReport automatically. The next time the same user runs the report, the auto saved parameter values will be available in the parameters' value lists for selection.