 Previous Page Next Page
Publishing Resources
Publishing resources from JReport Designer
Publishing resources from a local computer
Publishing resources from a remote computer
Before you can perform any tasks on JReport Server, you first need to have your resources published and organized in the server resource tree. The resources are reports, library components, catalogs and folders.
The JReport Server resource tree contains four built-in folders: My Components and Public Components are used to store library components with catalogs, while My Reports and Public Reports store reports with catalogs.
Publishing resources from JReport Designer
You can directly publish your reports, library components, or catalogs from JReport Designer to JReport Server. For detailed information, see the topic Publishing resources remotely in the JReport Designer User's Guide.
Publishing resources from a local computer
You can publish resources including reports, library components, catalogs and folders from a local computer to the server resource tree via the Resources page in the server console.
- Browse to the folder in which to publish the resources, then click Publish > To Local Server on the task bar.
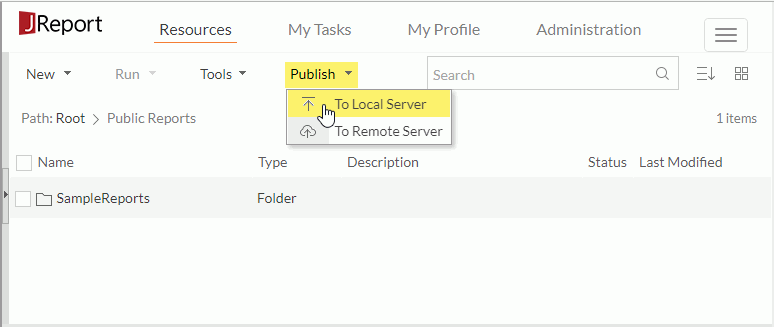
The Publish to Local Server dialog appears.

- Select a type from the Resource Type drop-down list.
- Specify properties for the to-be-published resources as required.
- If the Page Report or Web Report resource type is selected:
- In the From File text field, specify the report you want to publish with its full path.
- In the Resource Node Name field, specify a name for the report. This name is required and is used as the display name of the report in the server resource tree.
- Type a brief description to describe the report in the Resource Description field.
- From the Status drop-down list, select the status of the report.
- Active
The report can be run, advanced run and scheduled on JReport Server.
- Inactive
The report cannot be run, advanced run or scheduled on JReport Server.
- Incomplete
The report is not completely designed and cannot be run, advanced run or scheduled JReport Server.
- Specify values of the custom fields for the report if there are custom fields.
- Click the Browse button to specify a font directory for the report.
- Click the Browse button to specify a style directory for the report.
- Click the Browse button to specify a geographic information directory for the report.
- If the Catalog resource type is selected:
- In the From File text field, specify the catalog you want to publish with its full path.
- In the Resource Node Name field, specify a name for the catalog. This name is required and is used as the display name of the catalog in the server resource tree.
- Type a brief description to describe the catalog in the Resource Description field.
- Specify values of the custom fields for the catalog if there are custom fields.
- If the Component resource type is selected,
- In the From File text field, specify the library component you want to publish with its full path.
- In the Resource Node Name field, specify a name for the library component. This name is required and is used as the display name of the library component in the server resource tree.
- Type a brief description to describe the library component in the Resource Description field.
- Specify values of the custom fields for the library component if there are custom fields.
- Click the Browse button to specify a font directory for the library component.
- Click the Browse button to specify a style directory for the library component.
- Click the Browse button to specify a geographic information directory for the library component.
- If the Folder resource type is selected:
- In the Resource Node Name field, specify a name for the folder. This name is required and is used as the display name of the folder in the server resource tree.
- Type a brief description to describe the folder in the Resource Description field.
- In the Resource Real Path text field, type a local disk path as the real path of the folder. If you want to enable getting resources from the real path, check Enable Resources from Real Paths. The local disk resources will be mapped into the resource node of the folder in the server resource tree and the server will be able to always get resources and updates from the real path. For details, see Getting and Using Resources from a Real Path.
If this step is skipped, the publish job will simply create a new blank directory node in the server resource tree.
- Specify values of the custom fields for the folder if there are custom fields.
- If the Folder with Contents resource type is selected:
- Click the Browse button next to the From Folder text field to specify the folder where the resources you want to publish are saved.
- In the Resource Node Name field, specify a name for the folder. This name is required and is used as the display name of the folder in the server resource tree.
- Type a brief description to describe the folder in the Resource Description field.
- In the Resource Real Path text field, type a local disk path as the real path of the folder. If you want to enable getting resources from the real path, check Enable Resources from Real Paths. The local disk resources will be mapped into the resource node of the folder in the server resource tree and the server will be able to always get resources and updates from the real path.
- Specify values of the custom fields for the folder if there are custom fields.
- Click the Browse button to specify a font directory for the resources.
- Click the Browse button to specify a style directory for the resources.
- Click the Browse button to specify a geographic information directory for the resources.
- If you want to use Advanced Publish, click the Advanced Publish button. All resources contained within the specified folder will then be displayed. Check the resources you want to publish and specify the properties for each resource as required.
- If the Catalogs, Reports and Folders in Folder or Catalogs and Reports in Folder resource type is selected:
- Click the Browse button next to the From Folder text field to specify the folder where the resources you want to publish are saved.
- Click the Browse button to specify a font directory for the resources.
- Click the Browse button to specify a style directory for the resources.
- Click the Browse button to specify a geographic information directory for the resources.
- If you want to use Advanced Publish, click the Advanced Publish button. All resources contained within the specified folder will then be displayed. Check the resources you want to publish and specify the properties for each resource as required.
- If the resources you specify to publish contain reports created in earlier versions, check Automatically Convert Old Report Schemas, the reports will then be automatically converted into current version JReport reports when publishing finishes.
- To apply an archive policy to the resources that you are publishing,
- For resources published to the My Reports or Public Reports folder, check the Apply Archive Policy option, then specify the archive policy as required: Archive as New Version or Replace Old Version.
- For resources published to the My Components or Public Components folder, specify the maximum number of versions that will be listed in the version table of the resources.
Note that a folder by itself does not have versions; the archive policy specified for a folder applies to the folder content.
- If the resources are to be published to a public folder and you have the Grant permission on the folder, click the Set Permissions link to specify user permissions to the resources according to your requirement.
- Click OK to start publishing the resources.
Publishing resources from a remote computer
Before publishing resources remotely, you must have the resources compressed in any of the following formats in the remote computer: .zip, .jar, .gzip, .gz, .tar.gz, .tar or .tgz.
- In the Resources page of the JReport Server console, browse to the folder in which to publish the resources, then on the task bar of the Resources page, click Publish > To Remote Server.
The Publish to Remote Server dialog appears.
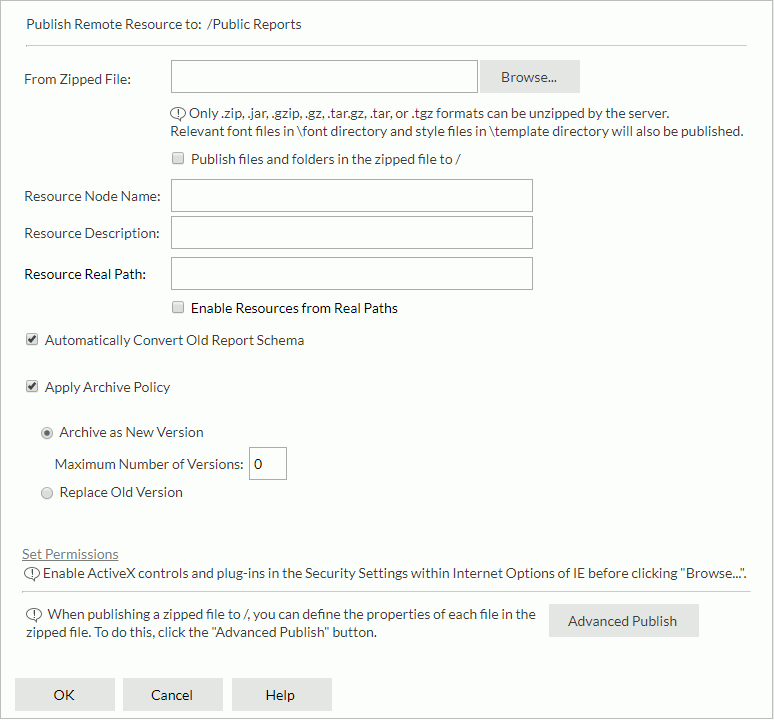
- Click the Browse button to specify the zipped file which contains the resources you want to publish.
- Specify where the resources will be published.
- If you want to publish the resources directly to the current open folder, check the Publish files and folders in the zipped file to /XXX checkbox.
- If you want to create a new folder in the current open folder to locate the resources,
- Make sure the Publish files and folders in the zipped file to /XXX checkbox is not selected.
- In the Resource Node Name box, specify the name of the folder. The name will then be used as the display name of the folder in the server resource tree.
- Type a brief description to describe the folder in the Resource Description box.
- Specify values of the custom fields for the folder if there are custom fields.
- In the Resource Real Path text field, type a local disk path as the real path of the folder. If you want to enable getting resources from the real path, check Enable Resources from Real Paths. The local disk resources will be mapped into the resource node of the folder in the server resource tree and the server will be able to always get resources and updates from the real path. For details, see Getting and Using Resources from a Real Path.
- If the resources you specify to publish contain reports created in earlier versions, check Automatically Convert Old Report Schemas, the reports will then be automatically converted into current version JReport reports when publishing finishes.
- To apply an archive policy to the resources that you are publishing,
- For resources published to the My Reports or Public Reports folder, check the Apply Archive Policy option, then specify the archive policy as required: Archive as New Version or Replace Old Version.
- For resources published to the My Components or Public Components folder, specify the maximum number of versions that will be listed in the version table of the resources.
- If the resources are to be published to a public folder and you have the Grant permission on the folder, click the Set Permissions link to specify user permissions to them according to your requirement.
- If you want to use Advanced Publish, click the Advanced Publish button. All resources contained within the zip file will then be displayed. Check the resources you want to publish and specify the properties for each resource as required.
- Click OK to start publishing the resources.
When publishing resources from a remote computer, the process is similar to that for a local publish. However there are some differences:
- Local Publish publishes resources from the machine where the server runs, while a Remote Publish publishes resources from a client machine using a web browser to the machine where the server runs.
- The resource type of Remote Publish can ONLY be a compressed file. You should compress the reports, library components, and catalog files in advance, and if special fonts are used in the reports or library components, add the corresponding font files into the compressed file as well. There are two approaches to building a compressed file.
- You can compress the resources manually using a third-party tool, such as Winzip and gzip.
- You can use jar.exe that the JSDK provides to build a compressed jar file directly. Use the command as follows:
%JAVAHOME%\bin\jar.exe -cvfM %DEST_JAR_FILE% %SOURCE_RESOURCES%
| Parameter |
Description |
| %JAVAHOME% |
The Java SDK install root. |
| %DEST_JAR_FILE% |
The destination file path and file name. The .jar file will be generated to the path you specify here, using the file name you provide. |
| %SOURCE_RESOURCES% |
The source file path and file name. Note that specifying a path for this parameter will cause the generated jar file to contain the same path information. For example, when you extract a jar file compressed using myReports\*.* for this parameter, the files will be extracted to a folder called myReports. JReport Server is not able to import a compressed file which contains the path information, so do not specify a path for this parameter. |
To generate a jar file containing no path information, switch to the source folder, and then carry out the compression. For example,
C:\myReports>C:\jdk1.8.0\bin\jar -cvfM c:\temp\aa.jar.
The jar file will be generated to c:\temp, as aa.jar, compressing all the files in c:\myReports, and containing no path information.
Always use this method if the folder you are compressing contains reports or library components with Chinese, Korean, or Japanese names.
Notes:
- In folders where library components can be published, only one catalog file is allowed.
- The Enable Resources from Real Paths option in the publish dialog can only be checked when the same option in the Administration > Configuration > Advanced page in the server console has also been checked.
- The Publish to Local Server option is always available to administrators in the JReport Server console. For end users, the option is displayed only when they have the privilege of publishing resources and have logged onto JReport Server from a local browser.
- After resources have been delivered to JReport Server, you may find that the publish time shown in the server UI is different from the client time. That is because the publish time takes the server time instead of the client time.
Previous Page Next Page