 Previous Page Next Page
Installing Using the Installation Wizard
Installing on Windows
Installing on Unix/Linux
Installing on Linux on IBM Z
Solving installation problems
This document shows you how to install JReport Server to different systems with the installation wizard.
Installing on Windows
- Download the JReport Server installation file for Windows from the Jinfonet download center.
- Double-click the installation file to run it, and click Yes in the prompt message dialog.
- The JReport Server Installation wizard appears. Click Next in the Welcome screen.
- In the License Agreement screen, check the option I accept the terms of the License Agreement and click Next.
- In the User ID and License Key screen, input the user ID and the license key separately. If you haven’t received the key please call us directly at +1 240-477-1000 or e-mail us at sales@jinfonet.com. Click Next.
- In the Choose Installation Set screen, input the directory in the text box or click the Browse button to specify the directory to install JReport Server and select the installation type from the following two:
- Typical Installation for Standalone Server
Installs JReport Server with the default configuration settings.
- Custom Installation for Standalone Server
Installs JReport Server in a standalone environment. If you choose this installation type, you can configure the server system environment in the installation wizard. The option is not available when the specified installation directory already contains a JReport Server.
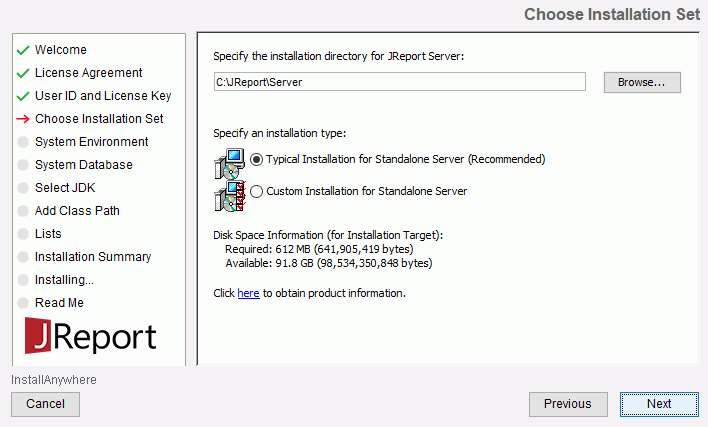
- Click Next.
If you select to install JReport Server in a folder that already contains an JReport Server, you will be prompted to choose whether to overwrite or upgrade the existing server. If you select Upgrade, the installer will replace the packages and create new batch/script files. Meanwhile a copy of the old batch/script files will be kept for your reference. You should use the batch/script files that come with the installer in order to make sure that all new packages are added to the class path and manually merge any changes you made into the new version. However, your configuration files and server runtime data of the existing copy will be kept, and you can choose to recover the previous version during the uninstallation of the newly installed JReport Server.
- In the System Environment screen (available only when the option Custom Installation for Standalone Server is selected in the Choose Installation Set screen), configure the following server system environment factors according to your requirements. System configuration can also be done in the JReport Server console after the server is installed and started.
- Advanced
- Demo
Specifies whether to install the JReport demo reports and dashboards which will be available in the Public Reports folder in the server resource tree.
- Click Next.
- In the System Database screen (not available when you upgrade JReport Server), configure the system database as required.
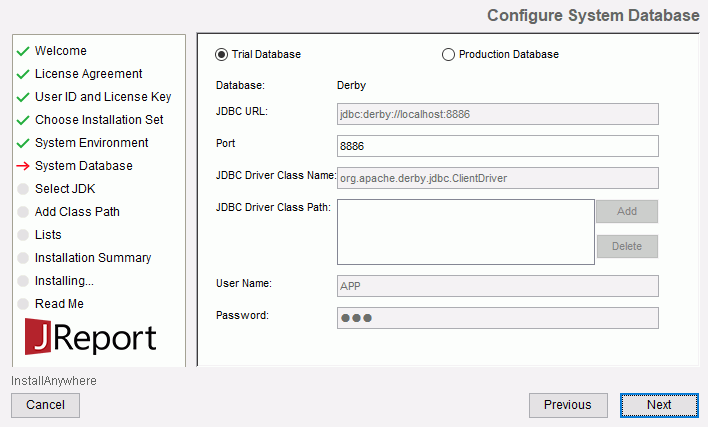
- Trial Database
Installs JReport Server with the default trial database Derby which is provided for testing and evaluation purposes only and which should not be used in a production system. The port is configurable in case it is being used.
- Production Database
Installs JReport Server with a production database. In a production environment, you need to configure your own production DBMS. Set the correct database connection information. If the connection fails after clicking Next, a message will pop up and you can choose to reset the connection. Or if you choose to continue after the failure, you will need to configure the database later. For details, see Configuring the Server Database.
- Click Next.
- In the Select JDK screen (not available when you upgrade JReport Server) choose the JDK to use with JReport Server. You can select one from the Installed JDKs box or click the Browse button to locate a JDK.
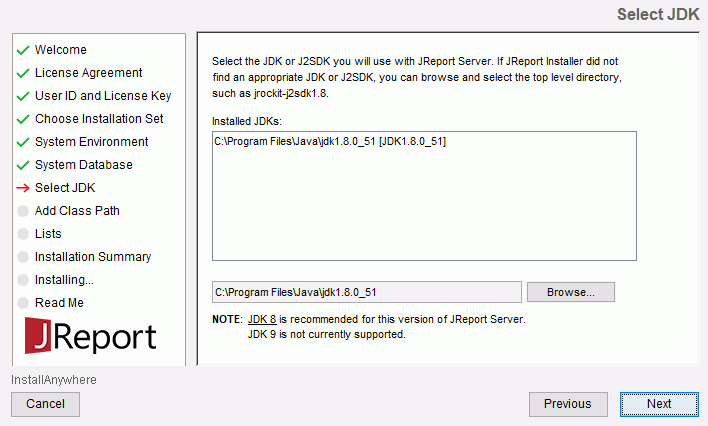
- Click Next.
- In the Add Class Path screen (not available when you upgrade JReport Server), click the Add button to add additional class paths as required. You can also choose to add them manually into the setenv.bat in
<install_root>\bin after installation.
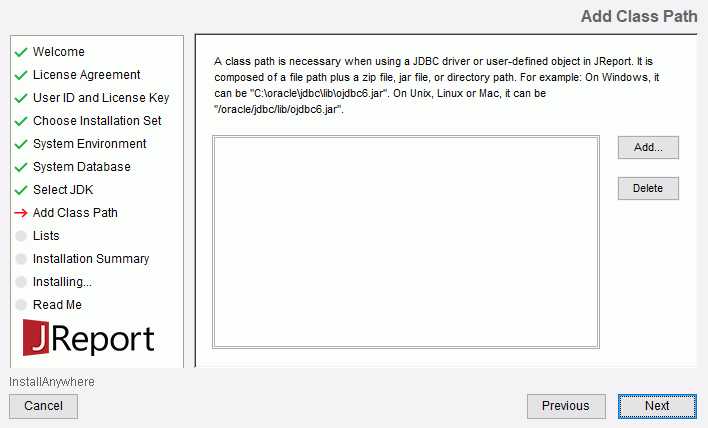
- Click Next.
- In the Lists screen (available only when you upgrade JReport Server), review the removed patches, modified configuration files and backup files if you want and click Next.
- In the Installation Summary screen, review the installation information and click Install to install JReport Server.
- In the Installing screen, the installing process and status are shown.
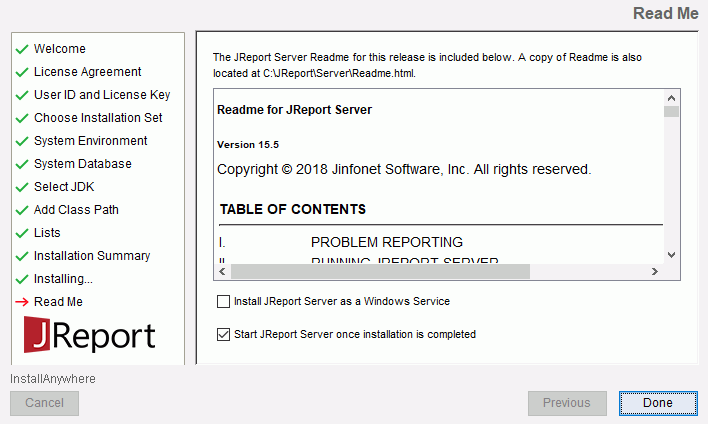
- After installation, the Read Me screen is displayed. Read the information and specify what to do next:
- To start JReport Server right away, keep the option Start JReport Server once installation is completed (available only on Windows) selected.
- To run JReport Server as a Windows service, select Install JReport Server as a Windows Service.
- To close the installation wizard, make sure that neither options are selected.
Click Done to finish the installation.
Installing on Unix/Linux
JReport Server supports Solaris, HP-UX, AIX, and Linux. In the following process, an X server is running and Java 8 is available, otherwise ask your administrator for help. Installing and running JReport Server requires that an X server has been configured.
- Download the JReport Server installation file for Unix/Linux from the Jinfonet download center.
If you need to transfer the installation file from your download machine to your Unix/Linux box, you should transfer it using FTP in binary mode.
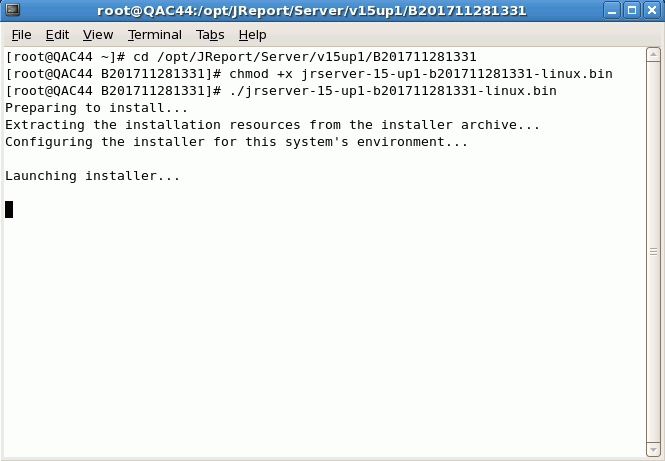
- Click the installation file to launch the installation wizard. Alternatively, you can open a console window by right-clicking on the blank area of the Desktop and selecting Open Terminal from the shortcut menu, and change the directory to the location of the file. Following are examples of the commands that can be used:
$ cd /opt/JReport/Server (or your preferred installation path)
To make the installation file executable, type the command:
$ chmod +x jrserver-xxx-linux.bin (change jrserver-xxx-linux.bin to the actual name of the installation file)
To run the installation file:
$ ./jrserver-xxx-linux.bin (change jrserver-xxx-linux.bin to the actual name of the installation file)
- Once the installation wizard has successfully loaded, you can follow the standard prompts to install JReport Server.
Installing on Linux on IBM Z
JReport Server supports Linux on IBM System z. In the following process, an X server is running and a JDK specially used for IBM is available, otherwise ask your administrator for help. Installing and running JReport Server requires that an X server has been configured.
- Download the JReport Server installation file for Linux on IBM Z from the Jinfonet download center.
If you need to transfer the installation file from your download machine to your Linux on IBM Z box, you should transfer it using FTP in binary mode.
- Open a console window by right-clicking on the blank area of the Desktop and selecting Open Terminal from the shortcut menu. Then:
- Change the directory to the location of the file. You can type the following command in the console window:
cd /opt/JReport/Server (input the absolute install location). Then press the Enter key on the keyboard.
- Type the following command to make the installation file executable:
chmod +x jrserver-xxx-linux.bin (change jrserver-xxx-linux.bin to the actual name of the installation file). Then press the Enter key on the keyboard.
- Type the following command to run the installation file:
./jrserver-xxx-linux.bin (change jrserver-xxx-linux.bin to the actual name of the installation file). Then press the Enter key on the keyboard.
See the following example.
- The JReport Server Installation wizard appears. Follow the standard prompts to install JReport Server.
Solving installation problems
If errors occur during the installation, you can check the log information recorded to find out what the problem is. Where logs are generated depends on when the installation process get stuck:
- If the installation is cancelled before you click the Install button in the installation wizard, logs are created on the desktop for Windows and in the userhome directory for Unix/Linux.
- If the installation is cancelled after you click the Install button in the installation wizard, logs are created in the logs folder in the installation root directory.
Besides, on a Windows platform you can specify the log destination that should use absolute path and log file name when launching the installation wizard by running the following command:
jrserver-xxx-windows.exe -D$INSTALL_LOG_NAME$="Install.log" -D$INSTALL_LOG_DESTINATION$="D:\temp"
or
$ ./jrserver-xxx-linux.bin -D\$INSTALL_LOG_NAME\$="Install.log" -D\$INSTALL_LOG_DESTINATION\$="/opt/temp"
Change jrserver-xxx-windows.exe or jrserver-xxx-linux.bin to the real file name of the installation file.
Feel free to send your questions to support@jinfonet.com.
Previous Page Next Page