BackPrevious Page Next PageNext

Example 1: Setting Up a Simple JReport Server Cluster

This example demonstrates how to configure a simple JReport Server Cluster by modifying the configuration options in the server console of each JReport Server as an administrator.

Example description:

Take the following steps to set up the cluster:

  1. Install the two JReport Servers respectively to C:\JReport\Server1 and C:\JReport\Server2 using the cluster enabled license key.
  2. Launch the JReport Server installed to C:\JReport\Server2.
  3. Access the server console of Server2 using port 8888 as an administrator, point to Administration on the system toolbar, click Configuration > Service from the drop-down menu, then set Port to 8883 to make it different from that of Server1. You may use any port number which is available on your system.
  4. Point to Administration on the system toolbar, click Configuration > Cluster > Configuration from the drop-down menu to display the Configuration page.
  5. Specify a cluster name and check the Enable Cluster option, then click Save to enable the cluster.
  6. Restart the JReport Server installed to C:\JReport\Server2.
  7. Log onto the server console of Server2 using the port 8883 specified in step 3 (http://localhost:8883) as an administrator.
  8. Go to the Administration > Configuration > Cluster > Configuration page, leave the Load Balancer Type as Round Robin.
  9. Check the Cluster Scheduler Lease option to enable lease for the cluster, then set the active count, valid time and check interval for the cluster scheduler lease.
  10. Change the Cluster Storage History, Realm and CRD Result Number of Copies to 1. We will just use one resource directory.
  11. Keep the default value 2 for Cluster Memory Storage Number of Copies, thus 2 memory copies will be shared in the cluster.
  12. Check the Notify via E-mail When a Server Is Down option, and in the E-mail Address text field, input the e-mail addresses of the people to whom you want to send a notification e-mail.
  13. Keep the default values for Properties Directory, Realm Directory, Resource Root, History Directory and Temporary Files Directory.
  14. Type the IP address or host name of Server2 in the Server's RMI Host text field, and type the port number in the Server's RMI Port text field.

    The port is the RMI port of the clustered server. The default port number is 1129. If there are two or more JReport Servers started on one machine, the RMI port number of each clustered server must be changed to a unique one, in order to avoid port conflicts.

    In this example, the port number is changed to 1130, since the other server will use the default port number 1129.

  15. Click Save to accept all the changes, then shut down the server.

    Cluster Settings

  16. Edit C:\JReport\Server2\bin\dbconfig.xml and remove the lines with auto-start-derbyservice. We only want Server1 to start the server DBMS since we will always use the Server1 database.
  17. Launch the JReport Server installed to 
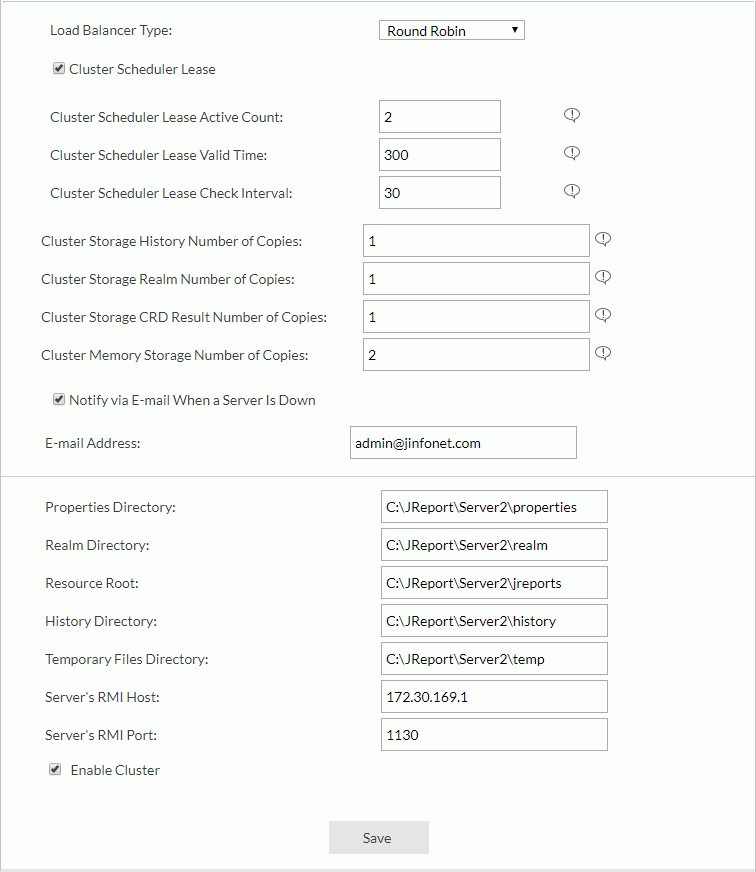
C:\JReport\Server1, log onto its server console (http://localhost:8888) as an administrator, then point to Administration on the system toolbar, click Configuration > Cluster > Configuration from the drop-down menu.
  18. Use the same cluster name as Server2, thus making Server1 join the existing cluster. Check the Enable Cluster option, then click Save to enable the cluster.
  19. Restart the JReport Server installed to C:\JReport\Server1, and log onto the server console again.
  20. Go to the Administration > Configuration > Cluster > Configuration page, configure Server's RMI Host and Server's RMI Port. Remember to keep Server's RMI Port to its default value 1129.
  21. Upon finish, click Save to accept all settings and shut down Server1.
  22. Copy rmi.auth in C:\JReport\Server1\bin to C:\JReport\Server2\bin. This allows RMI to be authorized between the two systems.
  23. Edit server.properties in C:\JReport\Server2\bin and remove cluster.member.id. It will be recreated when you restart Server2 with a unique number.
  24. Start the server Derby DBMS service by double-clicking the startNetworkServer.bat file in C:\JReport\Server1\derby\bin.
  25. Restart Server1 and Server2. It doesn't matter which one you started first.
  26. Access the server console of the first server using port 8888 as an administrator, and then submit a scheduled task. In the Scheduled tab, you will see the newly scheduled task.
  27. Log onto the server console of the second server as an administrator and create a new user Tom in the Administration > Security > User page.
  28. Access the server console of the second server using port 8883 as Tom, and then submit another scheduled task.

Notes:

BackPrevious Page Next PageNext