 Previous Page Next Page
Predefining queries in a catalog
Adding extra tables to a query
Filtering with the filter format
Creating computed columns in a query
Previewing a query
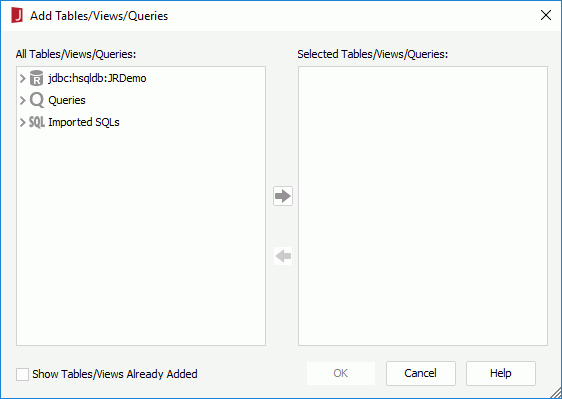
If the catalog data source is connected with multiple connections, you can mash up multiple data resources in the query that come from all these connections, including tables, views, synonyms, queries, imported SQLs, imported APEs, stored procedures and user defined data sources. When a query, imported SQL, imported APE, stored procedure or user defined data source is added, it will be added as a single table with all of its columns. When two resources (for example, a table and a view) use the same name, they cannot be added to the query at the same time, and when a table is already contained in a query, you cannot add the table and the query at the same time.
If the current catalog data source contains JDBC connections, the Show Tables/Views Already Added option is available. Check it if you want to show the tables, views and synonyms in the resource tree in the left box, which have already been added to the right box. You can then add the tables, views and synonyms of the JDBC connections to the query as many times as you want by providing different names for the tables, views and synonyms each time you add them.
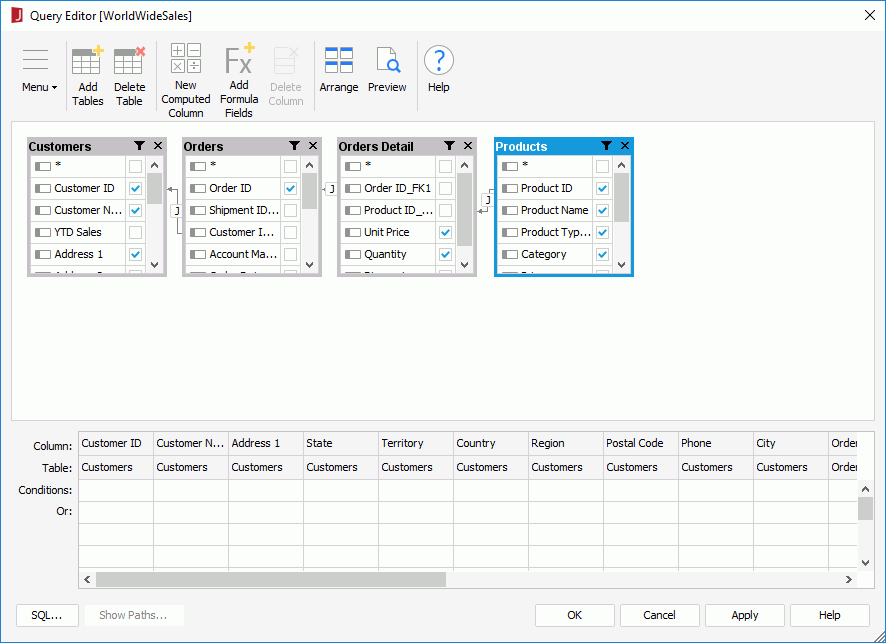
Besides predefining queries in a catalog from the Catalog Manager, you can also add queries to a catalog from the query resource tree in the Data screen of the report wizard. For example, when you insert a chart in a query based page report, you can click the <New Query...> item in the resource tree to create a query using the Query Editor for the chart.
Note: Normally, a query returns all the records that match its search criteria without considering whether there are duplicated ones. You can decide to get only one copy for each record by checking Menu > Query > Select Distinct. When this option is enabled, SQL SELECT statements are treated as SELECT DISTINCT statements. The query will search for identical records and ensures to return them only once instead of returning duplicate records from the database. However, this feature works when the query contains only tables, views, and synonyms from JDBC connections, or only tables from collections of the same MongoDB database of MongoDB 3.2 or higher and all joins between the tables are left-outer equi-joins of one-way link.

 to add them into the Selected Tables/Views/Queries box.
You can mash up multiple data resources from the same catalog data source in a query if you want. When two resources (for example, a table and a view) use the same name, they cannot be added to the query at the same time, and when a table is already contained in a query, you cannot add the table and the query at the same time.
To remove unwanted resources from the Selected Tables/Views/Queries box, select them and click  .
.
Based on the Auto Join options that are selected in the Query Editor category of the Options dialog, JReport will join the tables in a query automatically. You can also add more joins among these tables manually. Any joins defined between two tables are represented as arrows connecting the key fields from the two tables. JReport supports joining tables that come from different connections in the same catalog data source to create distributed joins.
By default all the three auto join criteria are turned on. If you do not want to apply any criteria in a query, in the Query Editor open Menu > Query > Auto Join and uncheck the criteria you want to turn off. To turn off the criteria for all queries, go to File > Options > Query Editor and uncheck the criteria you want to turn off in the Options dialog. However if you have specified to use pre-joins in your queries, the Auto Join feature will not take effect.
The join relationship is then established between the tables. When more than one relationship is required between two tables, you can create multiple joins between them.
However when you use the Auto Join feature to join the tables in a query automatically, you often see many joins that are not valid. You can delete unneeded joins by double-clicking the join icon  and clicking Delete Join in the Join Options dialog.
Alerting when Cartesian product is used
A Cartesian product is used when tables are included in a query together with no join specifications. You can specify whether to alert when this happens for a query as follows: in the Query Editor click Menu > Query > Current Query Option, then in the Query Options dialog, check or clear Warning When Cartesian Exists and click OK.
For example, Table A has three values: A, B and C. Table B has three values: 1, 2 and 3. Value A matches value 1, value B matches value 2, and so on. This is a specific match. However a Cartesian product could have value A matching with 1, 2 and 3, and value B matching with 1, 2 and 3, and so on. Depending on the data values, Cartesian products can produce a large dataset as unnecessary information will be duplicated. For every record in Table A a record will be created for every record in Table B, thus if Table A has 10 records and Table B has 10 records the result will be a dataset containing 100 rows. However not all Cartesian products are bad so you could use Cartesian product if the result is what you need.
 in the join line. The Join Options dialog appears.
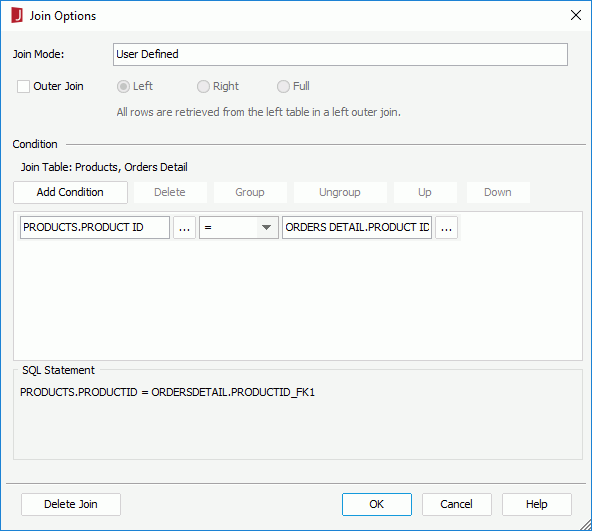
Click  beside the two text boxes to select a column in the two tables involved in the join, or a parameter or constant level formula in the current catalog data source and select the operator to compose the condition. You can also manually input the column, parameter or formula name in the text boxes (parameters and formulas should be input in the format @FieldName or :FieldName.). When a parameter is referenced in a join condition, the Ignore Predicate If Parameter Value Is Null setting of the parameter will be ignored. Using parameters in the join conditions can dynamically change query results at runtime. It works similarly as in query filters.
To add another condition line, click the Add Condition button and define the condition as required. Then from the logic drop-down list, specify the relationship between the two condition lines. Repeat this to add more condition lines if necessary.
To make some conditions grouped, select them and click the Group button, then the selected conditions will be added in one group and work as one line of conditional expression. Conditions and groups together can be further grouped.
To take any condition or group in a group out, select it and click Ungroup.
To adjust the priority of the conditions, select it and click the Up or Down button.
To delete a condition line, select it and click the Delete button.
Click the Delete Join button if you want to delete the join.
Notes:
You can specify criteria to filter the columns to be retrieved from the database for a query, so that when you build reports on the query, the returned results will be narrowed down.
Filter condition can be composed in both the format of a QBE (Query By Example) and a filter. Using the filter format, you can define the condition on the query and any tables in the query. The overall filter condition applied to a query will include all of them, that is QBE filter AND query filter AND table filter. Always click the SQL button to view your condition and parse the query to ensure the syntax is valid.
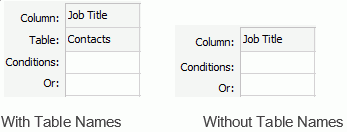
The criteria panel in the lower part of the Query Editor is for you to filter out some unnecessary records in a query. This filter is in the format of Query by Example (QBE). The advantage of QBE retrieval is that you don't need to learn a query language to frame a query. All the data fields added to a query are shown to you, and all you need to do is to enter the information that restricts the search to the required criteria. Any fields left blank will match everything.
When filtering with the QBE format, you are prompted to type the search criteria into a template resembling the data record. For example, if a column is labeled REGION, and it is a list of all 50 states in the United States. If you only want to see information from California (CA) and New York (NY), in the criteria panel, you can pick out CA and NY by placing their names in the column as below.

You just need to type in NY and CA. JReport Designer automatically places ='xx' (equal sign and quotes). Below is a list of the syntax available:
Note that in an Oracle database, if you want to use a Date or DateTime type parameter or a specific date or time to filter the column in a query, you need to apply the to_date() or to_timestamp() function in the filter condition, for example:

Tips:
Compared with QBE, the filter format provides you with more flexibility with composing the conditions. The expression includes not only the DBFields, but also formulas and parameters. You can also manually type in strings that are supported by the database.
When you use the filter format to filter a query, you can add the filter conditions on both the query and any tables in the query. A filter based on a query is applied as long as the query is used or referenced, while a filter based on a specific table in a query is applied only when the table is queried at runtime.
 on the title bar of the table in the Query Editor. In the Table Filter Condition dialog specify the filter conditions. The resources available for use are the columns in the table, the parameters, queries and valid formulas of the table in the same catalog data source as the query, and the special field User Name.
You can compose the filter conditions as follows:

 to specify the field in the Expressions dialog.
 to specify the value of how to filter the field in the Expressions dialog or input the value manually. You can also use sub-queries to narrow down the result, or use the special field User Name or a parameter to filter the query dynamically.
To make some condition lines grouped, select them and click the Group button, then the selected condition lines will be added in one group and work as one line of filter expression. Conditions and groups together can be further grouped. To take any condition or group in a group out, select it and click Ungroup.
To adjust the priority of the condition lines, select it and click the Up or Down button.
To delete a condition line, select it and click the Delete button.
When you input the value manually for a condition, you need to pay attention to the following:
Example1: Customers_Country='USA'.
Example2: Customers_Country in 'Australia','Germany','Mexico'
The quote marks can be typed by yourself or be added by JReport Designer automatically. To have the quote marks automatically added by JReport Designer, follow the steps below:
In an Oracle database, if you want to use a Date or DateTime type parameter or a specific date or time to filter the fields of a query, you need to use the to_date() or to_timestamp() function in the filter condition, for example:

When filtering the fields of a query with the filter format, you are also enabled to use sub-queries to narrow down the result. The following are syntaxes that can be used in sub-queries.
Quantified predicate
A quantified predicate compares a value with a set of values.
expression----+- = --+- SOME --+-- ( subselect )

                                        +- <>  -+  ANY    ---+

                                        +- ! = --+  ALL   ----+

                                        +- <   --+

                                        +- >   --+

                                        +- <=  --+

                                        +- ! >  --+

                                        +- >=  --+

                                        +- ! < --+
The subselect must specify a single result column and can return any number of values, whether they are null or not.
SELECT qty FROM sales WHERE qty>= ALL (SELECT qty FROM sales)

        SELECT BUYERID, ITEM FROM ANTIQUES WHERE PRICE != ANY (SELECT PRICE FROM ANTIQUES);
EXISTS predicate
The EXISTS predicate tests for the existence of certain rows.
- [ NOT ] EXISTS--(subselect)
The subselect may specify any number of columns and,
SELECT DISTINCT pub_name FROM publishers WHERE EXISTS (SELECT * FROM titles WHERE pub_id = publishers.pub_id AND type = 'business')IN predicate
The IN predicate compares a value with a set of values.
expression----+-- [NOT] IN --+-- ( subselect )
In the subselect form, the subselect must identify a single result column and may return any number of values, whether null or not null.
SELECT distinct pub_name FROM publishers WHERE pub_id IN (SELECT pub_id FROM titles WHERE type = 'business')The following example explains how to apply a subquery when filtering a field:
 beside the field text box. In the Expressions dialog, select the column Customers_Customer ID, then close the dialog.
 beside the value text box. In the Expressions dialog, click the Subquery tab. Select an existing query in the catalog to be the subquery. If you want to edit the selected query, click the Edit Subquery button. To create a new subquery, click the New Subquery button.
Here, we create a new query named subin, add the table Orders, select the column Orders_Customer ID, and add a condition "Ship Via=Express Delivery" in the Search Condition dialog.
Now, the subquery subin will be applied to the filter when you build a report that uses the Customers_Customer ID column.
Notes:
To remove the parameter condition from a query if this happens, check Menu > Query > Ignore Predicate If Parameter Value Is Null in the Query Editor.
Computed columns can be created in a query that is built on tables, views, and synonyms from one JDBC connection only.
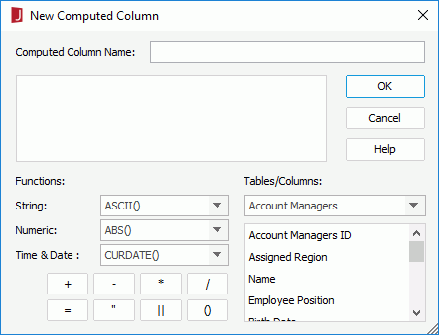
In the lower part of the dialog, there are functions and tables/columns of the query. These are just for your reference. You can specify the expression by yourself in the editing text box, only if the expression can be accepted by your database.
In addition, the functions in this dialog are not from the JReport system. They are from the database you are connected to. If you change your database, some of these functions may no longer exist. For each database, a different set of supported functions will be returned. The following functions will help you with writing an expression.
The computed columns added to a query are placed in the criteria panel of the Query Editor together with the table columns in the query. If you want to edit a computed column, you can double-click its name in the criteria panel and then edit in the displayed dialog.
When a computed column is created, it will be added to the SQL of the query. Suppose you have added a computed column named Net Total in a query and the computation is @UNITPRICE * @QUANTITY * (100 - @DISCOUNT) / 100, when you view the SQL statements of the query, you will see the following SQL statement being inserted into the SQL: @UNITPRICE * @QUANTITY * (100 - @DISCOUNT) / 100 AS "Net Total".
In addition to the table columns, you can also add formula fields to a query.
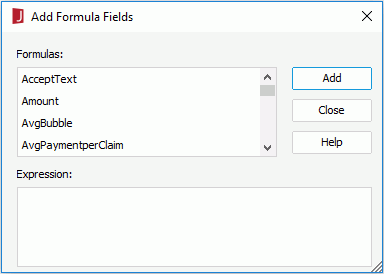
You can replace any formula field added to a query with another one. To do this, double-click its name in the criteria panel and then choose the required field in the Replace Formula dialog.
Note: The processing is very different from adding a computed column even though the data looks the same. The computed column is calculated by the database engine before the data is returned. The formula value is calculated by JReport after the data is returned so is less efficient.
For a query built on tables, views, and synonyms from one JDBC connection only, its SQL statements can be edited. To do this, in the Query Editor click the SQL button or click Menu > View > Edit SQL, the SQL dialog is then displayed showing the SQL statements used to execute the query like below.
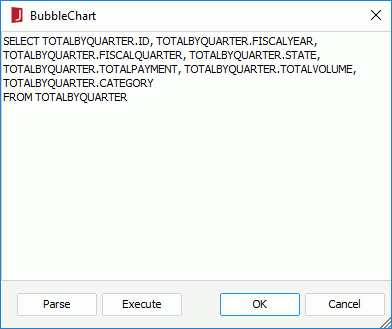
You can edit the query statements in the text area as follows:
Notes:
If you want to use a parameter which allows multiple values and is enabled to use one single value "All" to represent all its values (the parameter's Enable the "All" Option is true) in the SQL statement, you should embed the IN condition in parenthesis to enable the "All" value to work properly, for example:
select... from ... where ... and ... and (country in @pCountry) and (customerid in @pID)
When creating a query using the Query Editor, JReport allows you to copy and paste your own SQL statements directly in the SQL dialog as explained above. However, because JReport query parser recognizes a limited set of the SQL 92 standard, sometimes JReport is not able to parse the customized SQL statements. For example, functions such as aggregations using the GROUP BY clause are not supported. In this case, a warning message is displayed after you click the OK button in the SQL dialog asking whether to continue using the customized SQL statements. If you choose Yes, the customized SQL mode is enabled, in which all the functions in the Query Editor will be disabled, and you can only edit the query by modifying the SQL statements in the SQL dialog. You should guarantee the correctness of the customized SQL statements since JReport will not parse it although you can check it by using Execute and passing it to the database to check.
While using the customized SQL mode, you can see that the Menu > Query > Customized SQL Mode option of the Query Editor is enabled and checked. By unchecking this option, you can go back to use functions of the Query Editor, in which case the customized SQL statements will be lost and the SQL statements generated by JReport will be applied instead.
Therefore, if you want to use customized SQL, it is much better to copy your SQL to a text file and import it using the Import SQL feature.

In the Range box, specify the range of the records for previewing.
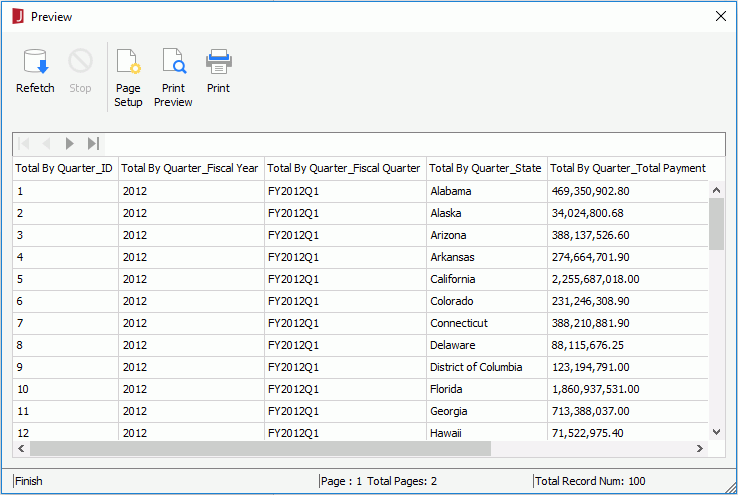
The Preview dialog appears showing the records. In the dialog, JTable is used to display the result set. When you open the dialog, the result set is cached, and when you close the dialog, the result set is released.
 ,
,  ,
,  and
and  to browse the records. If the type of the result set is TYPE_FORWARD_ONLY, the last page button will be disabled until you have browsed the last page.
Notes: