 Previous Page Next Page
Creating Business Views in a Catalog
Creating a business view
Adding and modifying elements in a business view
Adding elements by dragging
Creating and editing categories with dialog
Creating and editing view elements with dialog
Adjusting order of the elements
Renaming an element
Deleting an element
Defining hierarchies in a business view
Creating predefined filters for a business view
JReport Designer includes the interactive Business View Editor, with which you can create and edit any business views as you need.
Creating a business view
To create a business view in a catalog, take the following steps:
- Open the required catalog, then do either of the following:
- In the Catalog Manager, expand the data source in which you want to create the business view, then select the Business Views node or any existing business view in the data source and click New Business View on the Catalog Manager toolbar, or right-click the Business Views node in the data source and select New Business View from the shortcut menu.
- Click Home > New > Business View or File > New > Business View, specify the data source in which the business view will be created, then click OK.
- In the Enter Business View Name dialog, provide a name for the business view and click OK. The Add Tables/Views/Queries dialog is then displayed.
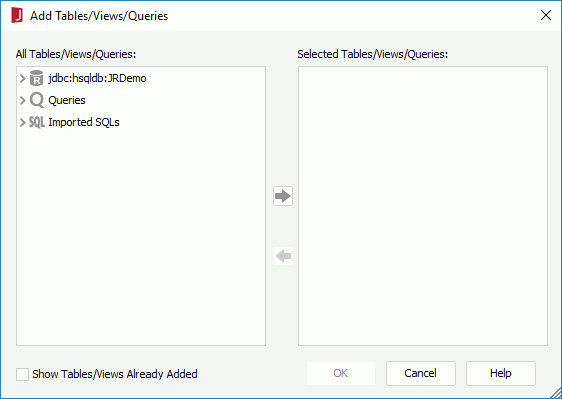
- In the left box, expand the resource nodes to add the resources based on which to create the business view to the right box, then click OK.
If the catalog data source is connected with multiple connections, you can mash up multiple data resources for the business view that come from all these connections, including tables, views, synonyms, queries, imported SQLs, imported APEs, stored procedures and user defined data sources. When a query, imported SQL, imported APE, stored procedure or user defined data source is added, it will be added as a single table with all of its columns. When two resources (for example, a table and a view) use the same name, they cannot be added at the same time, and when a table is already contained in a query, you cannot add the table and the query at the same time.
If the current catalog data source contains JDBC connections, the Show Tables/Views Already Added option is available. Check it if you want to show the tables, views and synonyms in the resource tree in the left box, which have already been added to the right box. You can then add the tables, views and synonyms of the JDBC connections for the business view as many times as you want by providing different names for the tables, views and synonyms each time you add them.
- If more than one data resource is added for the business view, the Query Editor appears, in which you can edit the data resources you select for the business view in the same way you would do for a query. You can:
- Select the columns in each table that you want to use for the business view. To select all columns in a table, check * at the top of the table. However for tables from MongoDB connections, you cannot select all columns by checking *. The PrimaryKey and ForeignKey columns in such table cannot be selected to a business view.
- Add or delete the data resources used for creating the business view.
- Set up joins between the data resources.
- Create formula fields to use in the business view.
- Add filters to narrow data used in the business view.
When done, click the OK button at the bottom of the Query Editor to apply the changes. If needed you can also click Menu > Query > Save As to save the data resources as a query.
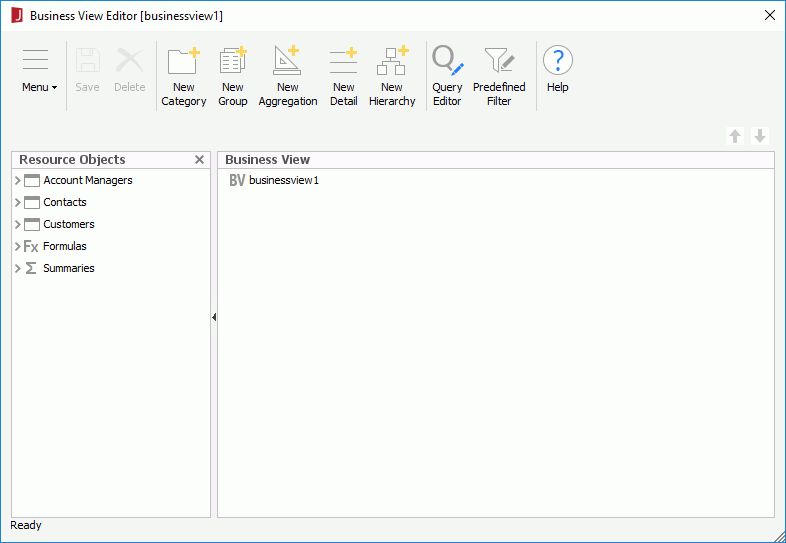
- The Business View Editor appears. All the resources you have selected for the business view, and the formulas and summaries in the current catalog data source that are valid for the selected resources are listed in the Resource Objects panel on the left of the editor.
- Add elements to the business view based on the available resources.
- Define hierarchies on the business view to allow end users to drill report data to particular groups.
- Create predefined filters on the business view for users to choose when using the business view to create reports.
- Configure security for the business view if necessary.
- Click Save on the toolbar to save the business view.
- Click Menu > File > Close to close the window. The business view will now have been added to the catalog.
Adding elements to a business view
After you have selected data resources such as tables, views, synonyms, queries, imported SQLs, stored procedures and user defined data sources to use in a business view, the data resources will be listed with their DBFields in the Resource Objects panel on the left in the Business View Editor, as well as the formulas and summaries in the current catalog data source that are valid to the data resources. You can use the resources to create view elements in the business view.
Tip: In the Catalog Manager you can also create, edit, rename or delete an element in a business view by using the corresponding command on the element's shortcut menu.
Adding elements by dragging
In the Business View Editor, a data resource is displayed as a folder containing their DBFields. You can drag DBFields, a whole data resource folder with all its DBFields, formulas, and summaries from the Resource Objects panel on the left to the business view or a category displayed in the Business View panel on the right. Multiple selection is supported.
JReport then converts the resources into corresponding view elements in the business view. The conversion is as follows:
- DBFields and formulas are added as group elements.
- A whole data resource folder with all its DBFields is added as a category with group elements.
- Summaries are added as aggregations based on the same sum-on fields and summary functions.
If necessary, you can convert the group elements to detail elements via the Edit View Element dialog.
Creating and editing categories with dialog
To create a category in a business view using dialog:
- In the Business View Editor, select the business view or an existing category in the Business View panel, then do any of the following:
- Right-click and select New Category from the shortcut menu.
- Click New Category on the toolbar.
- Click Menu > New > Category.
The Category Property dialog appears.
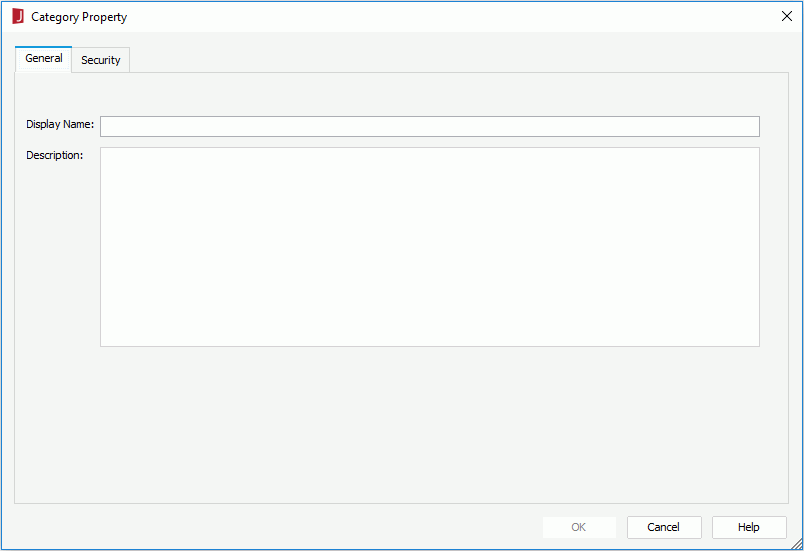
- In the General tab, set the display name of the category in the Display Name text box.
- Type a description for the category in the Description text box if required to help others get an idea about it. The description will be shown when end users hover the mouse pointer over the category in the resources panel of Web Report Studio and Page Report Studio.
- Click the Security tab and configure business view security if needed.
- Click OK. A new category will be added to the business view or the selected category. You can then add elements to it.
To edit a category:
- In the Business View Editor, select the category from the business view resource tree in the Business View panel, right-click it and select Edit Category from the shortcut menu.
- In the Category Property dialog, edit its general information in the General tab and security information in the Security tab.
- Click OK to confirm the changes.
Creating and editing view elements with dialog
To create a view element in a business view using dialog:
- In the Business View Editor, select the business view or any existing category into which you want to add the view element in the Business View panel, then do any of the following:
- Right-click and select New View Element from the shortcut menu.
- Click New Group, New Aggregation, or New Detail on the toolbar.
- Click Menu > New > Group/Aggregation/Detail.
The New View Element dialog appears.
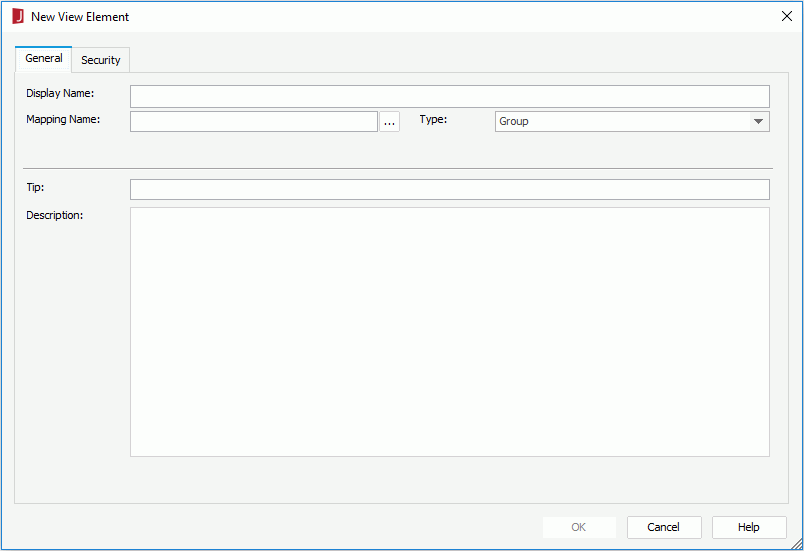
- In the General tab, decide the type of the view element by selecting the corresponding item from the Type drop-down list.
- Click the button
 next to the Mapping Name text box to specify the mapping field of the view element.
- Specify the display name of the view element in the Display Name text box.
By default, the display name is the same as the mapping name. You can change it according to your requirements.
- If you choose to create an aggregation object, click the Aggregate Function drop-down list to specify the aggregate function with which to summarize the mapping field. Check the Customized option if you want to create a custom aggregation, then click the Settings button to open the Formula Editor to compose the expression using resources in the current business view.
- Specify the tooltip and description of the view element in the Tip and Description text boxes respectively to help others get an idea about it. The tooltip will be shown when end users hover the mouse pointer over the view element in the business view resource tree at server runtime.
- Click the Security tab and configure business view security if needed.
- Click OK to create the view element and close the dialog.
To edit a view element:
- In the Business View Editor, select the view element from the business view resource tree in the Business View panel, right-click it and select Edit from the shortcut menu.
- In the Edit View Element dialog, edit its general information in the General tab and security information in the Security tab.
You can convert a group object to a detail object and vice versa by selecting Detail or Group from the Type drop-down list in the General tab.
- Click OK to confirm the changes.
You can also select multiple view elements and edit them at a time using the Edit View Element dialog to apply the same Tip and Description settings to the view elements, and when the selected view elements are all of the Group or Detail type, you can even change their element type to Detail or Group if needed.
Adjusting order of the elements
In the Business View Editor, you can change the position of the elements in any category or the categories in the business view in the resource tree of the Business View panel. The position here determines the display order of the elements and categories in any UI that shows the business view. You can place the elements and categories alphabetically or based on their using frequency to help others easily locate the desired one.
There are the following methods to change the position:
- Select a view element or a category and click
 or
or  on the toolbar.
- Right-click a view element or a category and select Move Up or Move Down on the shortcut menu.
You can also drag a view element or a category and drop it to another category node to change its position. By doing this the view element or category is placed at the end of the target category. However when you drag a group element or category to another category, the group or groups in the selected category will be removed from hierarchies that contain these groups and you need to add them from the target category to the hierarchies again.
Renaming an element
To rename a view element or a category, that is to change its display name, in the Business View panel of the Business View Editor, right-click the element or category and select Rename from the shortcut menu, or click on the name twice. The name text box then becomes editable. Input a new name and click outside of the text box to accept the change.
Deleting an element
When a view element or category is not required you can remove it from the business view. To do this, in the Business View panel of the Business View Editor, select the element or category, then,
- Click Delete on the toolbar.
- Right-click and select Delete from the shortcut menu.
- Drag and drop it to the Resource Objects panel on the left.
You can select multiple elements and delete them at one time.
Defining hierarchies in a business view
Hierarchies can be defined in a business view to allow end users to drill report data up and down to particular groups at runtime. A hierarchy can be regarded as a category that contains group objects sharing a hierarchical relationship in order from the highest level to the lowest. For example, these group objects can be added into one hierarchy called Dates: Sales Year, Sales Quarter, Sales Month, and Sales Date. When any of these group objects are used for grouping data in a table, crosstab or chart, end users can use the context menu to drill up or down to the next level. You can create any number of hierarchies such as dates, times, geography, product types, and so on.
The group objects added in a hierarchy are just references to the real group objects and therefore cannot be edited.
To create hierarchies in a business view:
- In the Business View Editor, do any of the following:
- Click New Hierarchy on the toolbar.
- Click Menu > New > Hierarchy.
- Right-click the business view root node or any category in the Business View panel and select New Hierarchy from the shortcut menu.
Tip: Hierarchies can be added into any category in a business view and it does not make any difference where it is placed. For easy look-up, you can put them under the root category.
- In the New Hierarchy dialog, provide a name for the hierarchy and click OK. A blank hierarchy is added to the business view resource tree.
- You can now add group objects into the hierarchy as a hierarchical group by dragging and dropping. From the business view resource tree, select a required group object and then drop it into the hierarchy. Where the group will be placed in the hierarchy depends on the dropped position:
- When you drop on the hierarchy root node, it will be placed to the bottom level of the hierarchy.
- When on an existing hierarchical group, it will be placed below this hierarchical group.
- When between two hierarchical groups, it will be placed between them.
You can also drag objects from the Resource Objects panel to the hierarchy. Then those that have not been added as group objects in the business view will be automatically added to the business view and placed at the bottom of the business view resource tree.
To adjust the position of the groups in the hierarchy, make use of the or button. The higher a group is placed, the higher its level is in the hierarchy.
To remove a group from the hierarchy, select it, then right-click and select Remove from Hierarchy on the shortcut menu, or drag and drop it to the Resource Objects panel.
- Repeat the above three steps to create more hierarchies in the business view.
To rename a hierarchy, select it from the business view resource tree, then right-click it and click Rename on the shortcut menu, or click on the hierarchy name twice. When the name text box becomes editable, input a new name and click outside of the text box to accept the change.
To remove a hierarchy, select it from the business view resource tree, then right-click it and click Delete on the shortcut menu, or click Delete on the toolbar. You can select multiple hierarchies and remove them all at a time.
- Save the business view to save the hierarchies into it.
You can also add and manage hierarchies in a business view from the Catalog Manager as follows:
- Adding a hierarchy
- In the Catalog Manager resource tree, right-click a category in the business view and select New Hierarchy from the shortcut menu.
- Provide a name in the New Hierarchy dialog and then click OK.
- A hierarchy will be added in the business view.
- Right-click the business view and click Edit on the shortcut menu to open the Business View Editor.
- Drag and drop group objects to the hierarchy to define its hierarchical groups.
- Save the business view to save the hierarchy.
- Removing a hierarchical group from a hierarchy
In the Catalog Manager resource tree, locate the group in the hierarchy, then right-click it and click Remove from Hierarchy on the shortcut menu.
- Renaming a hierarchy
In the Catalog Manager resource tree, locate the hierarchy in the business view, right-click it and click Rename on the shortcut menu, or click on the hierarchy name twice. When the name text box becomes editable, input a new name and click outside of the text box to accept the change.
- Removing a hierarchy
In the Catalog Manager resource tree, locate the hierarchy in the business view, then right-click it and click Delete on the shortcut menu, or click Delete on the Catalog Manager toolbar.
Creating predefined filters for a business view
You can predefine filters in a business view for users to choose when they design or modify data components that use the business view so as to filter out the unnecessary data in the data components.
If you want to filter data used in a business view, you need to make use of the query filter while defining the data resources to be used for the business view.
To create predefined filters in a business view:
- In the Business View Editor, click Predefined Filter on the toolbar or click Menu > Tools > Predefined Filter. The Predefined Filter dialog appears.
- Click the New button to add a filter.
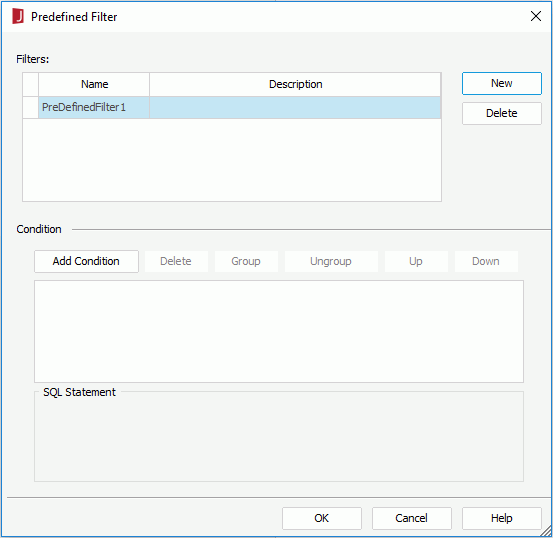
- In the Filters box, double-click in the Name and Description text boxes to edit the name and description of the filter.
- In the Condition panel, click the Add Condition button to add a condition line.
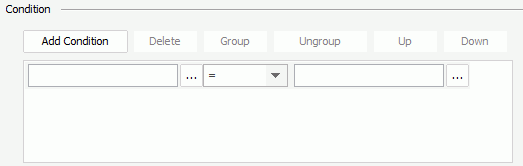
- Click next to the field text box, then in the View Element Resources dialog, expand the corresponding category node and double-click the element you want to filter, or select the element and click OK. You can also type in the name of the view element manually as @ElementName in the text box.
- From the operator drop-down list, select the operator with which to compose the filter condition.
- In the value text box, click to specify the value of how to filter the element. In the Values dialog, switch to the Value tab. All values of the selected element are listed, double-click the required one, then close the dialog. However if you choose to manually enter the element name in step 5, you need to select the element in the Fields tab of the Values dialog once again to get its value list. You can also select the special field User Name or a parameter in the Fields tab as the value to filter the business view dynamically (for the usage of parameters in filter conditions, see the example in Dynamically filtering queries).
If you are familiar with the values of the selected view element, you can also input the value manually (when the selected operator requires multiple values, you will have to enter the values manually). When you type in the value, if multiple values are required, they should be separated with ",", and if "," or "\" is contained in the values, input it as "\," or "\\".
- Click Add Condition to add more condition lines, specify the condition in each line, and define the logic (And or Or) between the condition lines.
To make some condition lines grouped, select them and click the Group button, then the selected condition lines will be added in one group and work as one line of filter expression. Conditions and groups together can be further grouped. To take any condition or group in a group out, select it and click Ungroup.
To adjust the priority of the condition lines, select it and click the Up or Down button.
To delete a condition line, select it and click the Delete button.
- Repeat steps 2-8 to add more filters and define the filter conditions. To remove a filter, select it from the Filters box and click the Delete button on the right.
- Click OK to save the filters.
- Save the business view to make the filters saved into it.
You can then apply the filters when creating or editing reports based on the business view in JReport Designer or at server runtime after you publish the corresponding catalog to JReport Server.
Notes:
- When the resources that are used in some predefined filters are removed from the business view, the next time when you open the Predefined Filter dialog, you will be prompted with warning messages showing the details and the filters will be removed automatically from the dialog as well.
- The following SQL type of data cannot be filtered: Db.SQL_BINARY, Db.SQL_BLOB, Db.SQL_CLOB, Db.SQL_LONGVARCHAR, Db.SQL_LONGVARBINARY, Db.SQL_VARBINARY and Db.SQL_OTHER.
Previous Page Next Page