 Previous Page Next Page
Exporting to Text
Exporting the report result to a Text file
Exporting the report result to a CSV file
Improving the performance of running a report to delimited format on JReport Server
JReport supports exporting to both a regular Text file and a CSV file.
Exporting the report result to a Text file
To export the result of a report to a Text file, follow the steps below:
- Open the report that you want to export.
- Click File > Export > To Text. The Export to Text dialog appears.
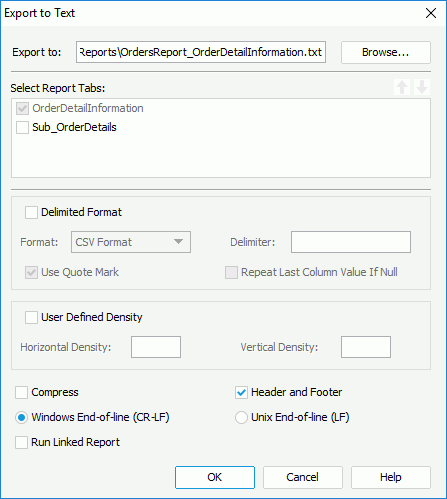
- Click the Browse button to specify the destination directory and file name of the exported Text file. You can also input the location and file name manually in the Export to text box (make sure that the folder you specify does exist, otherwise an error message will be produced).
- If you are exporting a page report, in the Select Report Tabs box, select the report tabs in the page report you want to export. The selected report tabs will be exported in the list order. You can click
 or
or  to change the order of the report tabs.
- Make sure that the Delimited Format checkbox is unchecked.
- Specify whether to use user defined density to export the report result. If yes, specify the horizontal density and vertical density respectively (click here for some notes about setting the density):
- Horizontal Density
Specifies the value for each unit of the horizontal density between columns. The resulting density is a direct ratio of the value you specify. That is, the greater the value, the smaller the width between columns.
- Vertical Density
Specifies the value for each unit of the vertical density between columns. The resulting density is a direct ratio of the value you specify. That is, the greater the value, the smaller the height between columns.
However by exporting using user defined densities, if the densities are not set appropriately, the fields in the report may overlap each other, so you are not recommended to use this way to export the report result to Text.
- Check Compress
if you want to generate the report result in a compressed size, that is to say there will be no clearance between the columns.
- By default, all headers and footers in the report will be exported, including Report Header/Footer, Page Header/Footer and Group Header/Footer. If you only want to export data in the Detail panel, uncheck Header and Footer.
- Specify whether to use CR-LF in Windows convention, or LF in Unix convention as the end-of-line character.
- Check Run Linked Report if you want to include the reports that is linked with the report (not including the detail reports) in the Text result. If you are only interested in the primary report, leave this option unchecked. Generating linked reports at the same time, especially when the linked reports contain a large amount of data, will cause performance issue.
- Click OK to start exporting.
You should pay attention to the following when using the Export to Text feature:
- The property Columned on the page report tabs or the web report will be ignored.
- Each object in the exported result file will be located according to its dimension values (x, y, width and height) you set in the Report Inspector.
- The List object could not be exported to a Text file.
- If the report contains the Drop-down List object, only the selected value in the list can be exported.
- The objects, which seem in the same line in other formats (such as PDF), may be in the different lines, or some unwanted blank lines will be generated. The exception is caused by the differences between the dimension values - y and height.
- When setting the value of Horizontal/Vertical Density:
- The value of Horizontal/Vertical Density must be greater than the character's width/height of the smallest field in the report (smallest field is the field with the smallest font size), otherwise, the value you set will not be applied.
- If the value of Vertical Density is greater than 0 and the value of Horizontal Density is less than 0, the value that you specify for the Vertical Density will be applied and the value of Horizontal Density will be specified by JReport.
- If the value of Vertical Density is less than 0 and the value of Horizontal Density is greater than 0, the value that you specify for the Horizontal Density will be applied and the value of Vertical Density will be specified by JReport.
- If the values of Vertical Density and Horizontal Density are both greater than 0 and the value of Horizontal Density is less than 11, the specified value of the two densities will be applied. Otherwise, they will be specified by JReport.
- If the values of Vertical Density and Horizontal Density are both less than 1, these densities will be specified by JReport.
Exporting the report result to a CSV file
When exporting the result of a report to a CSV file, you can set the property Columned on each page report tab or the web report to decide whether to export the result to a general CSV file or a columned CSV file. If you set the property to false, the report will be exported to a general CSV file. If you want to export the report to a columned CSV file, set the property to true.
The following is an example about exporting a page report which contains only one report tab to a general CSV file:
- Open the page report.
- In the Report Inspector, select the root node that represents the report tab and set the property Columned to false.
- Click File > Export > To Text.
- In the Export to Text dialog, keep the default export destination.
- Check Delimited Format checkbox, and then select CSV Format from the Format drop-down list.
- To enable records to be aligned well in the exported file, you are recommended to check Use Quote Mark. Otherwise, the commas in data values such as $78,321.00 will conflict with the delimiter (comma), and may potentially cause the data to be separated incorrectly when the exported file is further processed by other applications. The following shows an example:
Scarsdale,The Java King,(914) 657-9823,(914) 657-8745,$78,321.00
As shown above, it is difficult to determine whether the value is $78321.00 or $78 and 321.00.
- Check Repeat Last Column Value If Null so that when a cell in the exported CSV result has no value, value of the previous cell in the same column will be used.
- Specify the other settings if needed. Here we keep them to the defaults.
- Click OK to start exporting.
You should pay attention to the following when exporting a report to a CSV file:
- Whether a report is exported to a general CSV file or a columned CSV file,
- The data of each field should be in one column. If there is no data in a column, empty strings (" ") will be placed there automatically. In which case, the empty strings cannot be compressed. Only if there is no data in the entire line, can a row be compressed when you check the Compress option.
- In the Export to Text dialog, if you select Custom Delimited, you should export the report to a .txt file instead of a .csv file. Then, open the exported file with Excel, and the Text Import Wizard will be displayed. In this wizard, check the Delimited radio button, click Next, check Other on the Delimiters panel and key in the delimiter you specify in the Export to Text dialog, and then click Finish to view the result.
- When you specify to export a report to a general CSV file,
- Objects in the exported file will be located according to its dimension values (X, Y, Width, Height) you set in the Report Inspector.
- In the exported file, you may find that some column names are not aligned with their DBFields, so they may be displayed in different columns. To resolve this problem, make both the column names and its DBFields to be left aligned and adjust their location using the same Geometry X before exporting it to a general CSV file.
- When you specify to export a report to a columned CSV file,
- Objects in the exported file will be located according to their Row Index and Column Index property values. When setting values for these two properties, pay attention to the following:
- Make sure that the Row Index and Column Index property values for all objects in the report do not conflict with each other. Otherwise, some objects may be replaced.
- If either the Row Index value or Column Index value of an object is less than 1, JReport will ignore this object and all its children.
- In the exported file, you may find that some column names are not aligned with their DBFields. They may be displayed in different columns. To resolve this problem, set the Column Index value of the column name and its DBField to the same; if they are different, adjust it manually before exporting it to CSV format.
- If the report contains drawing objects, you need to manually adjust these objects' geometry properties, which are Top Attach Column, Top Attach Row, Bottom Attach Column and Bottom Attach Row.
- You are not recommended to export a mailing label report to a columned CSV file.
Improving the performance of running a report to delimited format on JReport Server
When exporting a page report to Text, if you want to improve the performance of running the page report to Delimited Format (such as the CSV format) on JReport Server, you are first required to set certain settings in JReport Designer. After which you can then publish the report to JReport Server for running to Delimited Format. See the example below:
- Start JReport Designer and open the page report tab you want to run to Delimited Format on JReport Server.
- In the Report Inspector, browse to the node of the report tab, find the two properties Fast Pass and Columned, and then set them to true.
- Choose the object you want to display in the result file, and then set the location for where you want it to be shown in the result file.
To do this, select the object, and set its Column Index and Row Index properties in the Report Inspector as required. Column Index refers to the column where the object will be located, and Row Index refers to the row where the object will be located in the result file. The numbers of the column and row start with 1, and are counted within its parent. For example, if you want to place the object in the first column and the second row in the detail section, set Column Index = 1 and Row Index = 2.
- Go to the server.properties file in
<server_install_root>\bin, and change the property engine.single_thread = false. This enables the property Fast Pass to take effect when running the report tab to Delimited Format.
- Publish the page report containing the report tab to JReport Server. When you run or schedule the report, after you choose the report tab and then choose To Text format, select the Delimited Format box, and then click Submit to generate a Delimited Format file.
Notes:
- When the Fast Pass property is set to true, in the report header panel, the values of the objects that use global parameters to make calculations will be incorrect. Page level calculation, such as Page Number and Total Page Number, will also be incorrect. In order to avoid such errors, you should move these objects from the report header panel to the report footer panel.
- Remember to set the positions for objects with the Column Index and Row Index properties. Otherwise, all the objects will be located in the first column and the first row of the result file.
Previous Page Next Page