 Previous Page Next Page
Exporting to RTF
To export the result of a report to a RTF file, follow the steps below:
- Open the report you want to export.
- Click File > Export > To RTF. The Export to RTF dialog appears.
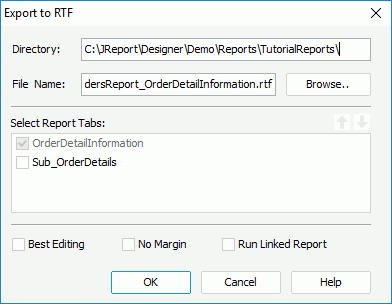
- Click the Browse button to specify the destination directory where the exported RTF file will be placed and the name of the file. You can also input the location and file name manually in the Directory and File Name text boxes (make sure that the folder you specify does exist, otherwise an error message will be produced).
- If you are exporting a page report, in the Select Report Tabs box, select the report tabs in the page report you want to export. The selected report tabs will be exported in the list order. You can click
 or
or  to change the order of the report tabs.
- Check the No Margin checkbox to remove the margins in the RTF result, which are set at report design time.
- Check Best Editing to apply the flow layout when exporting.
- Check Run Linked Report if you want to include the reports that is linked with the report (not including the detail reports) in the RTF result. If you are only interested in the primary report, leave this option unchecked. Generating linked reports at the same time, especially when the linked reports contain a large amount of data, will cause performance issue.
- Click OK to start exporting.
Notes:
- The Arc drawing object cannot be exported to a RTF file.
- If Best Editing is checked, the result can be edited easily, but the layout may be different from that you designed, because some flow layout properties will not be supported by JReport RTF exporter, such as clear, relative and so on.
- In the Best Editing mode, one report just has one default tab which is in the last paragraph, so others will be ignored.
Previous Page Next Page