 Previous Page Next Page
Setting Up JDBC Connections in a Catalog
Setting up the JDBC driver
Creating a connection via the JDBC driver
Example 1: Connecting to Amazon RDS
Example 2: Connecting to RedShift
Example 3: Connecting via WebLogic 6.1 Connection Pool
JReport supports most of the relational databases which support JDBC drivers. Via specific JDBC drivers, you can create connections which connect JReport catalogs to different relational databases.
Setting up the JDBC driver
Before you can retrieve data from a relational database in JReport, you should first set up the JDBC driver as follows:
- Install the JDBC driver according to the instructions provided by the JDBC driver supplier and understand the URL format required by the driver.
- Append the class path of the JDBC driver's jar files with full path into JReport's environment configuration file by editing setenv.bat for Windows or setenv.sh for Unix/Linux in
<designer_install_root>\bin.
For example, if you are using the Oracle JDBC driver ojdbc7.jar, append it as follows:
set ADDCLASSPATH=%JAVAHOME%\lib\tools.jar;c:\oracle\lib\ojdbc7.jar;
The step for appending the class path is very important. The same changes made to JReport Designer’s class path must be made to the class path for JReport Server too. A missing JDBC driver in the JReport start-up batch file or command line will result in a "ClassNotFoundError message" when you try to run a report. Meanwhile, if you want to use the Preview as Page/Web Report Result feature in JReport Designer, you also need to append the class path for the JDBC driver to setenv.bat/setenv.sh in <designer_install_root>\server\bin.
- Add the driver into JReport Designer's driver template file jdbcdrivers.properties in
<designer_install_root>\bin in the following format:
jdbc.drivers=JDBCDriverName:JDBCDriverName:...
where, JDBCDriverName is the JDBC driver name that can be auto-loaded when JReport starts up and ":" is the delimiter between two driver names. Below is an example of the jdbcdrivers.properties file which specifies an Oracle thin driver and an Interbase thin driver:
jdbc.drivers=oracle.jdbc.driver.OracleDriver:interbase.interclient.Driver
Once the drivers are added in jdbcdrivers.properties, later when you set up JDBC connections in JReport Designer, you do not need to provide the driver name manually. JReport will search from the beginning of the classpath and find one that contains the class specified.
Creating a connection via the JDBC driver
To set up a JDBC connection in a JReport catalog to retrieve data via JDBC driver, take the following steps:
- In JReport Designer, create a catalog or open a catalog.
- In the Catalog Manager, right-click the node of a data source and select New JDBC Connection from the shortcut menu. Click JDBC in the Select Connection Type dialog.
If you want to set up the connection in a new data source in the catalog, select any of the existing catalog data sources, click New Data Source on the Catalog Manager toolbar, then in the New Data source dialog, specify the name of the data source, select the JDBC connection type and click OK.
- In the Get JDBC Connection Information dialog, provide the necessary information to connect with the database.
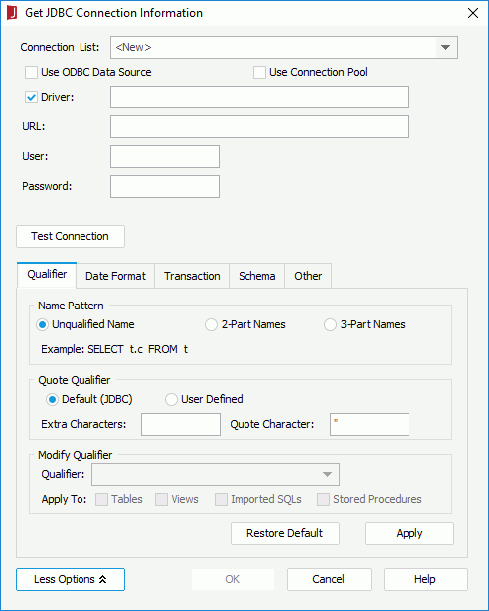
You have four ways to set up a JDBC connection:
- Setting up by adding an existing connection
- From the Connection List drop-down list select the connection. This list contains previously added connection information. The format of the connection information is JDBC URL/(JDBC Driver Name), for example:
jdbc:odbc:jinfonet/(sun.jdbc.odbc.JdbcOdbcDriver).
- The JDBC URL and JDBC driver name then appear in the corresponding text boxes.
- Setting up a new JDBC connection
- In the Driver text box specify the driver. If you have added the driver into jdbcdrivers.properties when setting up the JDBC driver, you can leave this empty. JReport Designer can find the correct driver from the file.
- Specify the URL of the JDBC driver in the URL text box.
The URL format is regulated by the driver itself.
- Input the user name and password used to connect to the database.
- Setting up an ODBC connection
- Uncheck the Driver checkbox and check Use ODBC Data Source.
- Enter the ODBC data source name in the DSN Name text box.
- Input the user name and password to enable accessing the database through the ODBC data source.
Notes:
- The ODBC-JDBC bridge is not included in Java JDKs after version 7. For JDK 8 or later, you will get an error that "No suitable driver found for jdbc:odbc". To resolve this issue, you need to add the path information of the ODBC-JDBC bridge to the class path during installation or by editing the setenv.bat (setenv.sh on Unix/Linux) file in
<designer_install_root>\bin.
- The JDK that JReport uses must match the ODBC data source that the operating system uses. For example, 32-bit ODBC data source can be connected by 32-bit JDK only.
- Setting up a connection via the WebLogic 6.1 connection pool
- Check the Use Connection Pool checkbox. The string weblogic.jinfonet.pool.Driver is then automatically displayed in the Driver text box.
- In the URL text box, specify the URL of the JDBC driver.
- Input the user name and password respectively.
- If your database has some special requirements, you can click the More Options button to modify the options according to your requirements.
- Click Test Connection to test whether the information you provide is available.
- Click OK to set up the connection, and you will be prompted with a message box showing the status of connecting to the database.
Upon finishing setting up the connection, the Add Tables/Views/Synonyms dialog is displayed, prompting you to add tables from the database to the JReport catalog. If you want to add tables at a later date, click Done.
For the Oracle, MySQL and MS SQL Server databases, you can also connect via connection plugins.
The following presents some examples of connecting to different relational databases:
Example 1: Connecting to Amazon RDS
Assume that:
Take the following steps to set up a connection which connects JReport Designer to a database via Amazon RDS:
- Open a catalog in JReport Designer.
- In the Catalog Manager, right-click the node of an existing data source and select New JDBC Connection from the shortcut menu. Click JDBC in the Select Connection Type dialog.
- In the Get JDBC Connection Information dialog, enter the JDBC driver class name com.mysql.jdbc.Driver in the Driver text box.
- In the URL text box, specify the URL in the format
jdbc:mysql://<hostname>:<port>/<database>. In this example, enter jdbc:mysql://jrdbtest.c4fb8hiicidz.us-west-2.rds.amazonaws.com:3306/sampledb1110. The URL is dynamically generated when you apply an instance.
- Input the user name dbadmin and password test1234 respectively.
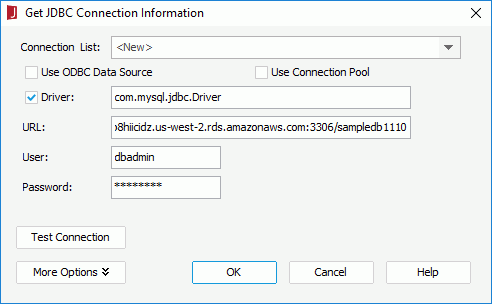
- Click OK to set up the connection.
Notes:
- It is not recommended to use RDS for small data queries since it takes a long time in the cloud.
- The RDS MySQL database is case sensitive for table names and column names, which may result in that JReport sample reports cannot run.
Example 2: Connecting to RedShift
Assume that:
Take the following steps to set up a connection which connects JReport Designer to a database via RedShift:
- Open a catalog in JReport Designer.
- In the Catalog Manager, right-click the node of an existing data source and select New JDBC Connection from the shortcut menu. Click JDBC in the Select Connection Type dialog.
- In the Get JDBC Connection Information dialog, enter the JDBC driver class name org.postgresql.Driver in the Driver text box.
- In the URL text box, specify the URL in the format
jdbc:postgresql://<hostname>:<port>/<database>. In this example, enter jdbc:postgresql://jinfonet-rsdw-demo.cfcn5ogc14yr.us-east-1.redshift.amazonaws.com:5439/sampledb. The URL is dynamically generated when you apply an instance.
- Input the user name dbadmin and password test1234 respectively.
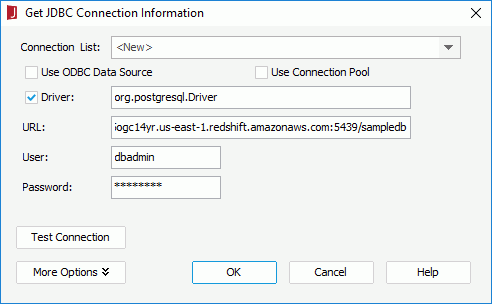
- Click OK to set up the connection.
Notes:
- Redshift does not support the "Double" data type and it uses "Decimal" or "Double Precision" instead.
- Redshift does not support "Bytea", "Bit(N)" or "Bit varying (N)" data type, and so far there is no alternative data type for that, therefore JReport binary data fields like photos stored in the demo database cannot be imported to Redshift.
- For detailed features, functions, and data types that are not supported in Redshift, see http://docs.aws.amazon.com/redshift/latest/dg/c_redshift-and-postgres-sql.html.
Example 3: Connecting via WebLogic 6.1 Connection Pool
- Set up the WebLogic Connection Pool.
- Assume that the WebLogic Server has been started, access the console through a web browser (
http://host:7001/console). Then, go to the left panel, and expand the JDBC node.
- Click the Connection Pools node. All the defined connection pools will be displayed in the right panel.
- Click the Configure a New JDBC Connection Pool link.
- In the Configuration tab, define the connection pool as follows. Then, click the Create button.
Name: jinfonet
URL: jdbc:odbc:jinfonet
Driver Classname: sun.jdbc.odbc.JdbcOdbcDriver
- Check the Connection Pool.
In the Monitoring tab, click the link Monitor all Active Pools to check if the pool is active. You will see the connection pool that you just created appear in the Monitoring tab.
- Click the Targets tab, and add examplesServer to the Chosen column (in order to assign the connection pool to the server). Then, click Apply to save your changes.
- Set up the data source.
- Click the Data Sources node in the JDBC node. In the right panel, click the Configure a New JDBC Data Source link.
- In the Configuration tab, enter the values in the following fields as follows:
Name: jinfonetDS
JNDI Name: jinfonetDS
Pool Name: jinfonet
- Click Create. The new data source will then be added in the Data Sources node in the left panel.
- Click the Targets tab and add examplesServer in the Available column to the Chosen column. Then, click Apply to save the changes.
- Add weblogic.jar to setenv.bat.
To connect via the WebLogic Connection Pool in JReport Designer, you will first need to add weblogic.jar in <weblogic_install_root>\wlserver6.1\lib to the ADDCLASSPATH variable of setenv.bat. In this example, supposing that you have installed JReport Designer in C:\JReport\Designer, and WebLogic in C:\bea, you will have to modify setenv.bat in C:\JReport\Designer\bin to add C:\bea\wlserver6.1\lib\weblogic.jar to the ADDCLASSPATH variable as follows:
set ADDCLASSPATH=%JAVAHOME%\lib\tools.jar;C:\bea\wlserver6.1\lib\weblogic.jar;
- Set up the connection in JReport Designer.
- Open a catalog.
- In the Catalog Manager, right-click the node of an existing data source and select New JDBC Connection from the shortcut menu. Click JDBC in the Select Connection Type dialog.
- In the Get JDBC Connection Information dialog, check Use Connection Pool. The string weblogic.jinfonet.pool.Driver automatically displays in the Driver text box.
- Fill in the URL jdbc:weblogic:jinfonet:@<hostname>:7001:jinfonetDS, where <hostname> is the host name or IP address of the WebLogic Server, 7001 is the port on which the WebLogic Server listens, and jinfonetDS is the JNDI Name of the data source. Then, click OK.
Note: The data types longbarbinary and BigDecimal are not supported when a WebLogic Connection Pool is used.
Previous Page Next Page