 Previous Page Next Page
Modifying Tables
Editing a table with wizard
Sorting the detail data of a table
Inserting columns and rows in a table
Converting the columns in a table
Aggregating on the detail columns in a table
Showing/Hiding the summaries in a table
Formatting the cells in a table
Resizing the columns and rows in a table
Showing, hiding and deleting the columns/rows in a table
For any table in a report, you can further modify it at any time. For example you can change the data displayed in the table, summarize the data in a detail column of the table, and so on.
Tip: Some table operations require to use the shortcut menu on table cells, however when a table cell is entirely occupied by another object, it would be difficult to access its shortcut menu. In this case, you can resize the object in the cell first, then in the Report Inspector, select the node representing the cell that holds the object to select the cell itself, after that you can right-click on the blank area in the cell to get the shortcut menu.
Editing a table with wizard
Once a table has been created, you can further modify it by accessing its shortcut menu wizard which is composed by a set of screens that are similar to the wizard screens used to create the table. For example, you can change the data used by the table, edit the groups in the table, and so on.
- Right-click the table and select Table Wizard from the shortcut menu to display the Table Wizard.
- In the Data screen, specify a new data source for the table if required.
- In the Display screen, specify the detail fields to display in the table. Use the button
 to replace any current field. Click the Sort Fields By button to specify in which manner to sort the detail values.
- In the Group screen, specify the criteria for grouping data in the table.
- In the Style screen, select the style you want to apply to the table.
- Click Finish to accept the changes.
For more detailed information about defining a table, see Inserting Tables in a Report.
Sorting the detail data of a table
By default, the detail records in a table are displayed randomly; they are displayed in the order they are returned from the fetch operation. You can specify that JReport sort the records in a table, and also within the groups in the table if any.
- When creating or editing a table with the table wizard, click the Sort Fields By button in the Display screen. The Sort Fields By dialog appears.
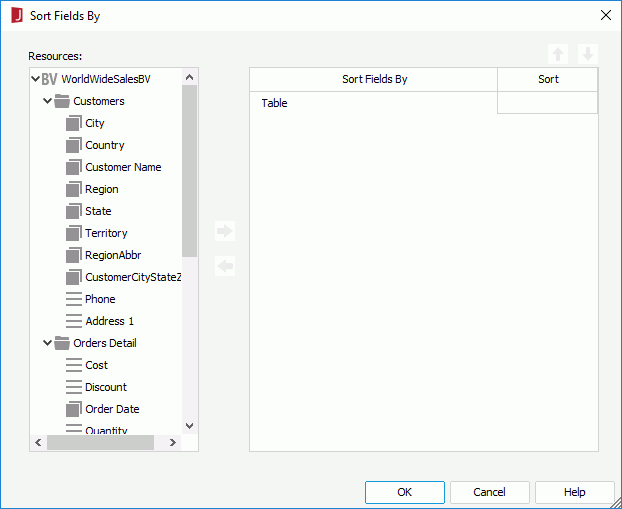
- From the Resources box, select a field as the sort-by field and click
 or drag and drop it to the right box.
- For a table created using a business view, you can choose from the group objects
 and detail objects
  in the business view the table uses, as well as the dynamic formulas used as Group
  and dynamic formulas used as Detail
  created for the business view in the current report.
- For a table created using a query resource in a page report, you can choose from the DBFields in the query resource and the formulas and parameters valid to the DBFields in the current catalog. For the usage about parameters as sort-by fields, see Sorting data dynamically.
- From the drop-down list in the Sort column, specify in which manner to sort the field, Ascend or Descend.
- Add more sort-by fields and specify the sort manner of each field using the same way. Click
 or
or  to adjust the order of the sort-by fields, which will determine the sort priority of the fields at runtime. If a sort-by field is not required, select it and click
  or drag and drop it to the Resources box.
- Click OK to accept the sort settings.
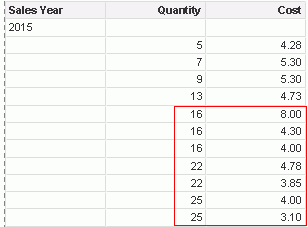
For example, if a table displays the detail fields for product quantity and cost and you want to sort the detail values first by quantity ascending and then cost descending. You can specify the sort manner as follows:

And the results will be:
Note: The following SQL type of data cannot be sorted: Db.SQL_BINARY, Db.SQL_BLOB, Db.SQL_CLOB, Db.SQL_LONGVARCHAR, Db.SQL_LONGVARBINARY, Db.SQL_VARBINARY and Db.SQL_OTHER.
Inserting columns and rows in a table
Besides using the table wizard to create the columns and rows in a table, you can also insert columns and rows directly using the Insert Column/Row feature. A table can contain the following types of columns: group columns, detail columns, summary columns and common columns.
To insert a group column:
- Select the table or a column in the table, right-click it, then click Insert > Group Column on the shortcut menu. The Insert Group Column dialog appears, with the existing groups the table contains listed in an indented structure in the right box. You can edit the groups if you want.
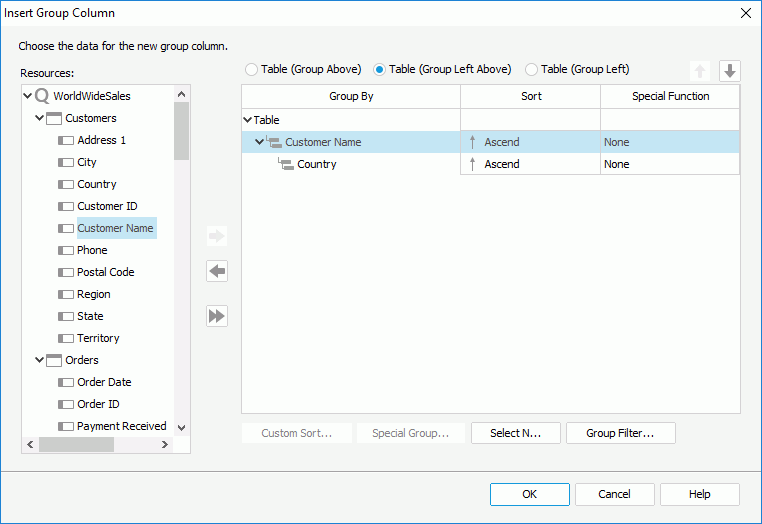
- In the right box, select the group level of the new group column by selecting Table or an existing group, then select a data field in the Resources box as the group-by field and
click
 or drag and drop it to the right box.
- For a table created using a business view, you can select from the group objects in the business view, as well as the dynamic formulas used as Group created for the business view in the current report.
- For a table created using a query resource, you can select from the DBFields in the query resource, as well as the formulas and parameters valid to these DBFields in the current catalog. For the usage about parameters as group-by fields, see Grouping data dynamically.
- In the Sort column, set the sort manner of groups at this group level.
- Specify the position of the group-by field in the table:
- Table (Group Above)
Specifies to place the group-by field in its own row above the detail information.
- Table (Group Left Above)
Specifies to place the group-by field in its own row and column above and left of the detail information.
- Table (Group Left)
Specifies to place the group-by field in its own column left of the detail information.
- If the table is created using a query resource, you can also specify the following:
- Click the Select N button to specify the Select N condition for the group level.
- Click the Group Filter button to specify the filter condition to filter groups at this group level.
- If the group-by field is of Numeric/String/Date/Time type, select a special function for it from the Special Function drop-down list.
- Repeat the above steps to add more group columns if required. You can make use of the
 and
and  buttons to adjust the group levels.
- Click OK to insert the group columns.
To insert a detail column:
- Select the table or a column in the table, right-click it, then click Insert > Detail Column on the shortcut menu. The Insert Detail Column dialog appears.
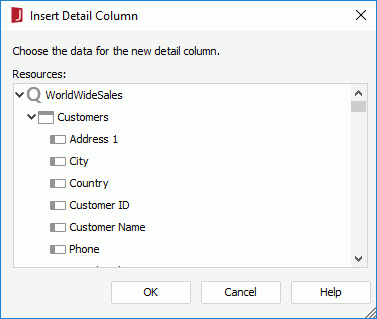
- Select the data field you want to use for the detail column.
- For a table created using a business view, you can select from the group objects and details objects in the business view, as well as the dynamic formulas used as Group or Detail created for the business view in the current report.
- For a table created using a query resource, you can select from the DBFields in the query resource, as well as the formulas and parameters valid to these DBFields in the current catalog.
- Click OK. A new detail column is inserted in the table and where it is placed depends on the following: if you use the column shortcut menu to insert the column, the new column is placed before the selected column; if you use the table shortcut menu to insert the column, it is placed after the last detail column, or as the last column in the table when there is no detail column.
To insert a summary column:
- Select the table or a column in the table, right-click it, then click Insert > Summary Column on the shortcut menu. The Insert Summary Column dialog appears.
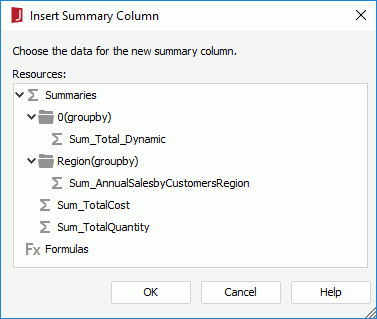
- Select the data field you want to use for the summary column.
- For a table created using a business view, you can select from the aggregation objects in the business view, as well as the dynamic formulas used as Aggregation and dynamic aggregations created for the business view in the current report.
- For a table created using a query resource, you can select from the dynamic summaries in the current catalog that are valid to the DBFields in the query resource, as well as the static summaries without group-by fields or based on the same group-by fields as these in the table if the table contains groups. The formulas that are valid to the summaries are also available in the resource list.
- Click OK. A new summary column is inserted in the table which calculates data as follows:
- For a table created using a business view,
if it is a summary table in a web report or library component, the summary column calculates data based on the innermost group of the table and the whole table; otherwise the summary column calculates data based on each group of the table and the whole table.
- For a table created using a query resource, when the selected summary is a dynamic summary, the summary column calculates data based on each group of the table and the whole table; when the summary is a static summary with a group-by field, the summary column calculates data based on the same group in the table; for a static summary without a group-by field, the summary column calculated data based on the whole table.
Where the new summary column is placed in the table depends on the following: if you use the column shortcut menu to insert the column, the new column is placed before the selected column; if you use the table shortcut menu to insert the column, it is placed after the last summary column, or as the last column in the table when there is no summary column.
To insert a common column:
- Select a cell in the table, right-click it and click Insert on the shortcut menu. In the Insert dialog, specify where the column will be inserted, before or after the selected cell, then click OK. A new common column will then be inserted into the table in the position you specify.
- Select a column in the table, right-click it, then on the shortcut menu, click Insert > Common Column. A new common column will then be inserted before the selected column.
- Select the table, right-click it, then on the shortcut menu, click Insert > Common Column. A new common column will then be inserted as the last column in the table.
You can then drag the required data fields from the Data panel or objects allowed for table cell from the Components panel into the column.
To insert a row:
- Select a cell or a row in the table, right-click it and then click Insert on the shortcut menu.
- In the Insert dialog, specify where the row will be inserted, above or below the selected cell.
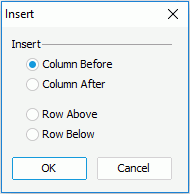
- Click OK. A new row of the same type is then inserted into the table according to the specified position. You can drag the required data fields from the Data panel or objects allowed for table cell from the Components panel into the row.
Converting the columns in a table
You can convert the group columns into detail columns. For a detail column, when the field in it can be used as group-by field, you can also convert it to a group column.
To convert a group column into a detail column:
Select the group column, right-click it, and select Convert to Detail from the shortcut menu, then the conversion is done.
To convert a detail column into a group:
- Select the detail column you want to convert, right-click it and select Convert to Group from the shortcut menu (the menu option is disabled when the field in the selected detail column has already been used as group-by field in the table).
- In the Select Group Position dialog, specify the position for the newly converted group-by field.
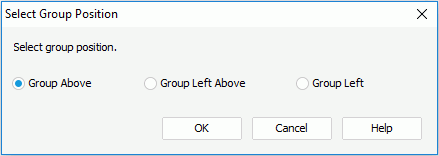
- Group Above
If selected, a new group header panel is added to hold the group-by field and the detail column is removed.
- Group Left Above
If selected, the detail column is converted to a group column and a new group header panel is added to hold the group-by field.
- Group Left
If selected, the detail column is converted to a group column and the group-by field is added to the left of the detail field in the same column.
- Click OK to save the changes.
Aggregating on the detail columns in a table
You can calculate data based on any detail column in a table if required.
- Right-click the detail column and select Aggregate On from the shortcut menu. The Aggregate On dialog appears.
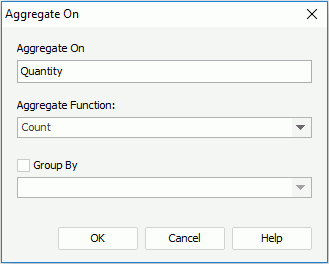
- From the Aggregate Function drop-down list, specify the function to calculate the field in the detail column.
- Specify the Group By option.
- If the table has groups and you want the summary to be applied on certain group level, check Group By and select the corresponding group-by field from the drop-down list below.
- If you want the summary to be applied on the whole dataset, check Group By and do not select any field from the drop-down list below.
- If you want to create a dynamic summary, keep Group By unchecked. Then the summary will be applied on every group level and the whole dataset at the same time.
- Click OK. Data in the detail column will be calculated based on the group-by setting using the specified function.
Then:
- For a table that is created using a query resource in a page report, a summary which is given a default name Function_DetailFieldName will be created and saved into the current catalog.
- For a table that is created using a business view, a dynamic aggregation which is given a default name Function_DetailFieldName will be created in the current report.
Showing/Hiding the summaries in a table
When creating or editing a summary table via the table wizard in a web report or library component, once you have added any summary on its table header/footer or group header/footer, after the table is generated the Show Summary Field command will be activated on the shortcut menu of all the summary columns in the table. You can use the menu command to show or hide the summaries in the headers/footers.
- Right-click the summary column that contains the required summary.
- From the Show Summary Field submenu select/deselect the corresponding table/group header/footer to show/hide the summary on the specified locations.
The summary will be placed in the intersection of its summary column and the table/group headers/footers.
Formatting the cells in a table
Resizing the columns and rows in a table
You have the following ways to resize the columns/rows in a table:
- To resize a column, drag the boundary on the right side of the column to the required width. If the boundary is not the rightmost one, the column width will change, but the total width of the table will not change. If you want to change both the column width and the table width, press the Shift button on the keyboard while dragging. To resize a row, drag the boundary below the row to the required height. Both the row height and the table height will change. If you want to change just the row height, press the Shift button on the keyboard while dragging the boundary.
- Select a table cell, change its Height or Width property in the Report Inspector, or right-click it, select Row Height or Column Width from the shortcut menu, then in the corresponding dialog, type a value and click OK. The height/width of the row/column in which the cell is located will then be changed according to your specification.
- Select a column/row, right-click it and select Column Width/Row Height from the shortcut menu. In the Column Width/Row Height dialog, type a value in the text box and click OK. The width/height of the column/row will then be changed according to your specification.
Showing, hiding and deleting the columns/rows in a table
To specify which columns you want to show in a table:
- Right-click the table and select Show Column from the shortcut menu. The Show Column dialog appears.
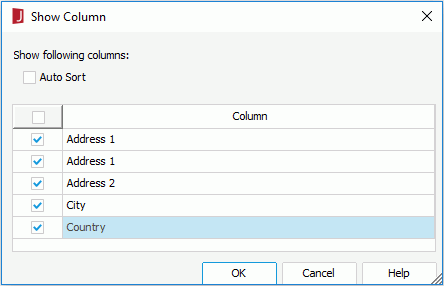
- All the columns in the table are listed, with text in cells of the table header panel representing corresponding columns. By default, the columns are listed according to their order in the table. Check Auto Sort if you want them to be listed alphabetically.
- Check the checkboxes ahead of the columns you want to show.
- Click OK to accept the changes.
To hide a table row:
Select the row, right-click it, and select Hide from the shortcut menu.
To hide a table column:
- Select the column to be hidden, right-click it, and select Hide Column from the shortcut menu.
- Select the table, right-click it and select Show Column from the shortcut menu. In the Show Column dialog, uncheck the column to be hidden.
- Select the cell in the table header, which is in the column you want to hide, right-click the cell and select Hide Column from the shortcut menu. If the table has more than one header panel, use the header in the first row to access the Hide Column command.
To delete a column/row:
- Select the specific column or row to be deleted, right-click it and select Delete from the shortcut menu to delete it.
- Select a cell which is in the column/row to be deleted, right-click it, and then select Delete from the shortcut menu. In the Delete dialog, select Column or Row, click OK. The column or row is then deleted from the table.
Note: When a table is created, by default its structure is fixed and no row can be deleted. If you want to delete a row, you need to insert a same row first by using the shortcut menu, then you can delete the original row.
 Previous Page Next Page
 Previous Page Next Page
 to replace any current field. Click the Sort Fields By button to specify in which manner to sort the detail values.
 or drag and drop it to the right box.
 and detail objects
  in the business view the table uses, as well as the dynamic formulas used as Group
  and dynamic formulas used as Detail
  created for the business view in the current report.
 or
or  to adjust the order of the sort-by fields, which will determine the sort priority of the fields at runtime. If a sort-by field is not required, select it and click
  or drag and drop it to the Resources box.


 or drag and drop it to the right box.
 and
and  buttons to adjust the group levels.


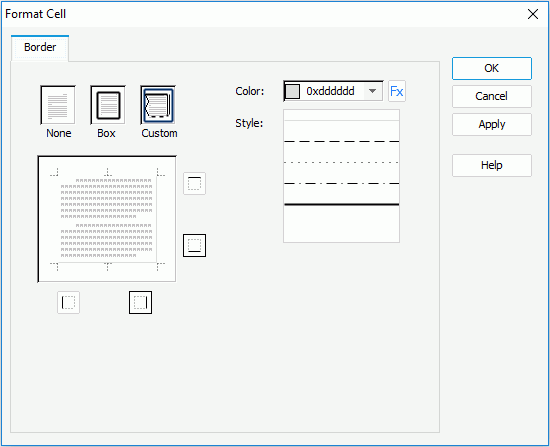
 ,
,  ,
,  , or
, or  to set the visible/invisible status of the left, right, top, or bottom border.
 and select a formula from the drop-down list.