 Previous Page Next Page
Inserting DBFields in a report
Changing the display type of DBFields
In a query based report, the DBFields or database fields refer to fields directly from databases, user data sources, hierarchical data sources, or other data sources; in a business view based report, they are the group and details objects in the business view.
See an example: The SampleComponents catalog, included with JReport Designer, contains reports that have examples of how each component type could be used in a report. For the DBField component example, open <install_root>\Demo\Reports\SampleComponents\ForDBField.cls.
DBFields can be inserted in the report areas listed in Component placement.
The Insert Fields dialog appears.

Notes:
In a query based page report, you can add summaries for DBFields as follows:
The Insert Summary dialog appears.
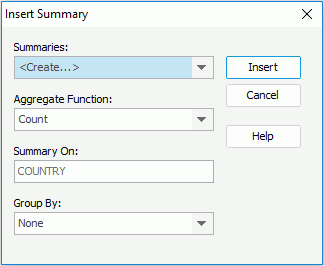
A summary with the default name Function_DBFieldName is then created in the current catalog and is available under the Summaries node in the Data panel. You can drag it to use in the report.
JReport Designer provides 13 kinds of display types: Text, Image, Barcode, Rank, Text Field, Hidden Field, Text Area, Checkbox, Radio Button, Image Button, Button, List, and Drop-down List. By changing the display type of a DBField, you can map the DBField to other value or image to be displayed instead.
A DBField in a page report created using query resources can be displayed as one of the following general types: Text, Image, Barcode and Rank. It can also be displayed as a basic web control, including Text Field, Password, Text Area, Checkbox, Radio Button, Image Button, and Button. While the DBFields in a web report or library component can only be displayed as Text.
The Display Type feature is not supported in page reports created using business views.
To edit the display type of a DBField:
If a basic web control type is selected, see Inserting basic web controls in a page report for details about how to make settings of the display type.
You can make the DBFields in a report link with other reports, locations specified by URLs, e-mail addresses, or Blob data type fields. The links can either be simple links or conditional links. With conditional links, different targets can be loaded based on different conditions.
To bind a link to a DBField, right-click it and click Link on the shortcut menu, then take the same procedure as described in Binding Links to Labels.
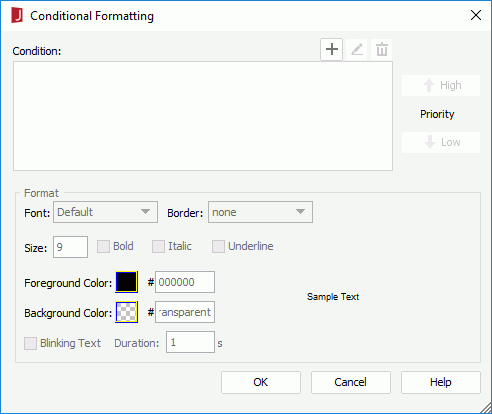
You can add conditional formats to DBFields in a report, then when a specified condition is fulfilled, the format defined on the condition will be applied to the field values automatically. This is very useful to highlight values that might need to be acted on by end users.
To add conditional formats to a DBField:
 on the Format tab.
The Conditional Formatting dialog appears.
 above the Condition box. The Edit Conditions dialog appears.
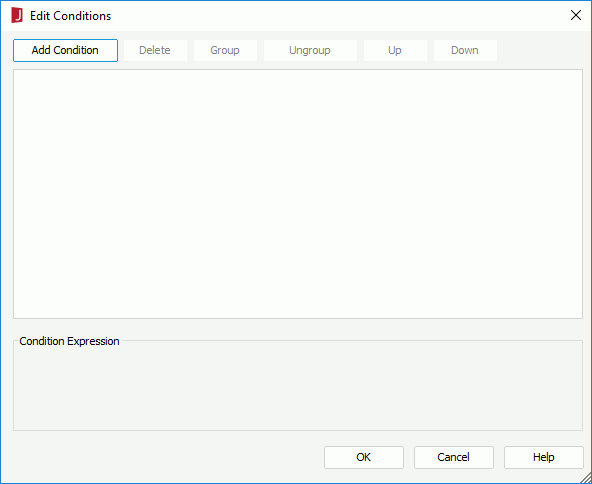
To make some condition lines grouped, select them and click the Group button, then the selected condition lines will be added in one group and work as one line of filter expression. Conditions and groups together can be further grouped. To take any condition or group in a group out, select it and click Ungroup.
To adjust the priority of the condition lines, select it and click the Up or Down button.
To delete a condition line, select it and click the Delete button.
The newly added condition is then displayed and highlighted in the Condition box in the Conditional Formatting dialog.
To edit a condition, select the condition from the Condition box, click  , then edit the condition in the Edit Conditions dialog.
To adjust the priority of the conditions, select a condition and click the High or Low button.
To remove a condition and the corresponding format, select the condition from the Condition box and then click  .
.
Note: To make the blink settings of a conditional format take effect in HTML report result or at server runtime, you need to make sure the web browser you use supports CSS3 animation, such as Firefox, Safari, Chrome and Internet Explorer 10 or above.
When a report has many DBFields, you may find it difficult to locate where a certain field is. To easily find out the field you have lost track of in your report, you can make use of the Find DBField feature.
To find a DBField in a report:
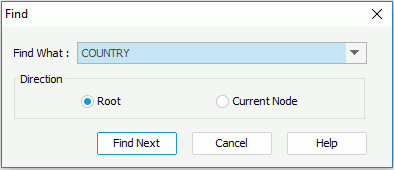
Tip: Besides DBFields, formula fields used in the report will also be listed in the Find What drop-down list, so you can also use this dialog to locate a formula in a report.