 Previous Page Next Page
RLS and CLS at data source scope
Importing/exporting security information from/to external XML files
Record-level security (RLS) and column-level security (CLS) allow you to control user access to different subsets of data and ensure that people only see what they are supposed to see: record-level security allows you to define which records are to be revealed to any given user, while column-level security allows you to define which report column is revealed to any given user. This enables you to provide different users with accordingly different, but appropriate contents. No matter to whom you need to provide information, a plant manager or thousands of customers, JReport allows you to control access to information according to your requirements.
You can define record-level security either based on a catalog data source, or on a single report, or simultaneously on both. When a report is applied RLS of both the report and data source scopes, the report-scope RLS will override that of the data source scope. Column-level security can be defined on data source scope only.
A record-level security (RLS) and column-level security (CLS) policy at data source scope refers to a security entry in the data source of a catalog. It allows you to control user access to different subsets of data, and ensures that people only see what they are supposed to see: certain records and/or columns. If you want to implement the same security policy in a group of reports, you can simply apply the same security entry to the reports, without having to repeatedly build the security information for each report. The predefined security entries work within a data source range, that is they can be applied to resources that are in the same catalog data source. A security entry with only RLS can also be used to control parameter values at runtime.
Security entries, together with the business view security defined in a catalog can be exported to a security file using the File > Export Security command, which will be stored in the same location as the current catalog. The security file can be used to create dynamic security for catalogs on JReport Server (for details, refer to Dynamic Security in the JReport Server User's Guide).
To add a security entry to a data source in a catalog, follow the steps below:
 and select Import from JReport Server from the drop-down menu, then in the Import from JReport Server dialog specify the information to connect to a started JReport Server to import users, roles, and groups from the server, on which to set the security policy.
Make sure that JReport Server has been started and you are an administrator user of JReport Server in order to perform the importing.
and select Import from JReport Server from the drop-down menu, then in the Import from JReport Server dialog specify the information to connect to a started JReport Server to import users, roles, and groups from the server, on which to set the security policy.
Make sure that JReport Server has been started and you are an administrator user of JReport Server in order to perform the importing.
You can also click and select Add User, Add Role or Add Group from the drop-down menu to add principals manually in JReport Designer or import them from an XML file. However if you choose the two methods to add users, roles and groups, in order for the security policies specified on them to work on JReport Server, you should make sure there are the same users, roles and groups created on JReport Server, and then import them to JReport Designer with the Merge option. In this way the users, roles and groups are updated to those on the server while the security settings are reserved.
You can further edit or remove the principals in the User/Group/Role panel.
 . In the corresponding edit dialog, edit it as required. Changes to server users, roles, and groups will not take effect on JReport Server.
 .
.Notes:
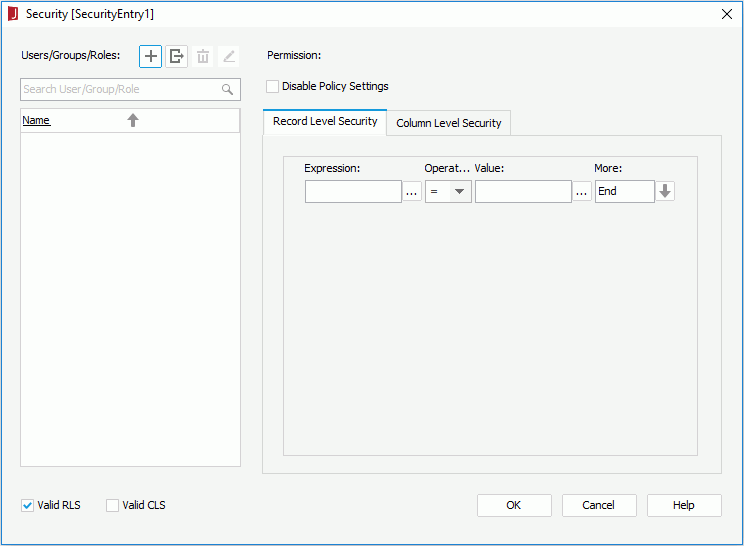
 next to the Expression text box to specify the field on which to build the condition in the Expressions dialog. You can also type the name of the field manually in the text box (the input format should be @FieldName or @"Field Name" when the field name contains blank space). next to the Value text box to specify the value of how to compose the condition using the Expressions dialog. You can select the special field User Name or a parameter in the Expressions dialog as the value to compose the condition dynamically (the usage of parameter in a security condition is similar to that of in a query filter condition).
If you are familiar with the values of the specified field, you can also input the value manually. When you type in the value: String values should be quoted with single quotes; the format of Date values should be consistent with that of your database; multiple values should be separated with ","; if "," or "\" is contained in the values, write it as "\," or "\\".
 and select AND or OR from the drop-down menu. To add a new group, click beside the condition line which shows End or End Group, then select New Group and specify the relationship between two adjacent groups.
The following table lists the options that are available for adding condition lines and groups:
| Option | Description |
|---|---|
| AND | Specifies the relationship between two expression statements as logical AND. If this line is the last line in the expression list, when you select AND or OR, a new line will be appended to the end of the list. |
| OR | Specifies the relationship between two expression statements as logical OR. If this line is the last line in the expression list, when you select AND or OR, a new line will be append to the end of the list. |
| Insert Row | Inserts a new line behind the current line. |
| Delete Row | Deletes the current line. |
| New Group | Adds a new expression group to the list. The relationships between two groups can be:
|

Once a security entry is created, you can further edit it, rename it, or delete it according to your requirement. To do this, right-click the security entry in the Catalog Manager resource tree and select the corresponding option on the shortcut menu.
You can import or export your security information from/to external XML files (*.acl.xml) when editing security in JReport Designer. While if you want to use XML security information, you must first purchase a special license. For more information, contact Jinfonet Support (support@jinfonet.com).
in the User/Group/Role panel and then select Import from File from the drop-down menu. In the Open an xml file dialog, select the XML file that contains the required security information and then click Open.  in the User/Group/Role panel. In the Save dialog, specify the name of the file and the location where to save it, then click Save.
The security information contained in the XML file is shown as follows:
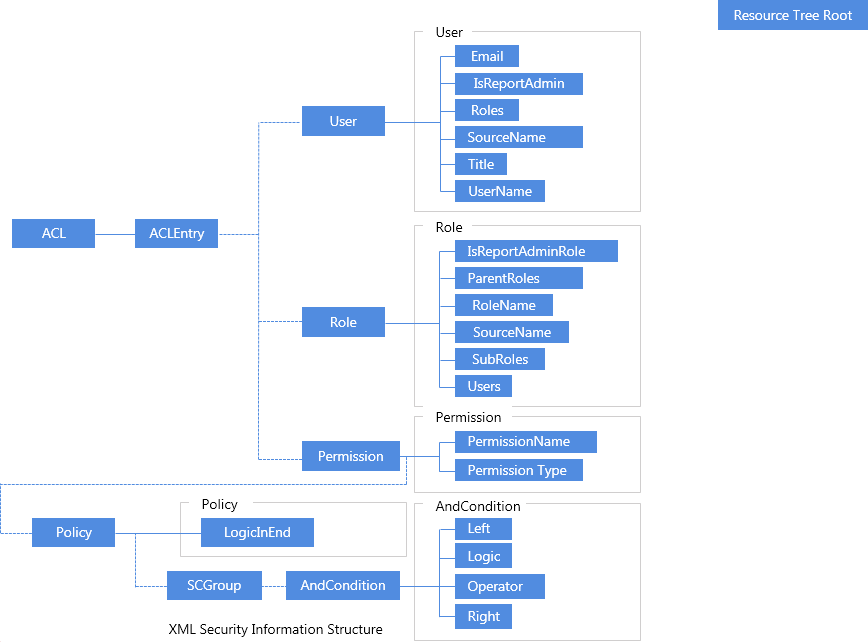
You can create your own XML format security information files according to the above structure. However, the best way to generate an XML security information file is to use the Security dialog. With this dialog, you can edit the security information, and then export it to an external XML file.
For example, if the simple security policy has been set up as follows:
| USER | |
|---|---|
| User Name: | d_d_u1 |
| Belongs to Role: | d_d_r1 |
| Permissions: | (@"Customer ID">=5 AND @"Customer ID"<=10) AND @"YTD Sales"<=65000 |
| ROLE | |
| Role Name: | d_d_r1 |
| Belongs to User: | d_d_u1 |
The corresponding XML code would be:
<ACL version="1.2" xmlns:xsi="http://www.w3.org/2001/XMLSchema-instance"> |
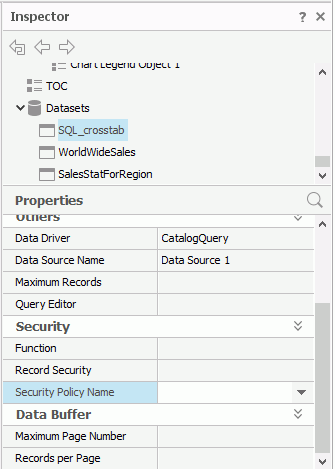
You can apply a security entry to a page report or library component by setting the Security Policy Name property on its datasets. However, since column-level security is not supported on library components at present, only the security entries which have not been defined with CLS are available in the value list of library components' Security Policy Name property.
After the page report or library component is published to JReport Server, when different users log onto the server and run it, they will only see the data they are supposed to see. However, as the user defined users and roles in a security entry may not be recognized by JReport Server, if your security policy contains such users/roles, you need to first create these users and roles respectively on JReport Server, and then in JReport Designer, synchronize the security information with the server by means of importing security information from the sever with the Merge option checked.
However for page reports, the security entries for the primary reports and subreports can be set and applied individually, with different combinations causing different results. The relationships between the security policy settings and the viewing results are shown in the following table:
| Primary Report | Subreport | Users in Policy | Users NOT in Policy |
|---|---|---|---|
| Ð | Ð | No security policy is applied to either the primary report or the subreport. Users can therefore view all records in both reports. | |
| Ï | Ð | Can view specified records in the primary report and all records in the subreport. | Can view no records in the primary report and all records in the subreport. |
| Ð | Ï | Can view all records in the primary report and specified records in the subreport. | Can view all records in the primary report and no records in the subreport. |
| Ï | Ï | Can view specified records in both the primary report and the subreport. | Can view no records in either the primary report or the subreport. |
Ï - Security policy has been set and applied.
Ð - Security policy has not been set and applied
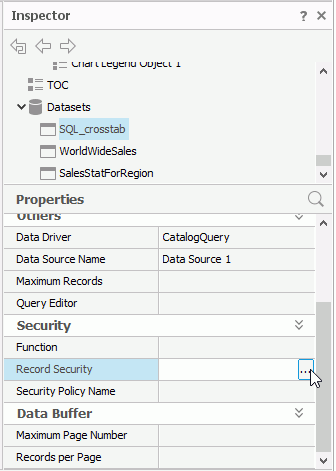
The record-level security (RLS) can also be of report scope, that is, you can create different record-level security policies for different reports. When a report is applied RLS of both the report and data source scopes, the report-scope RLS will override that of the data source scope. Column-level security (CLS) is not supported at report scope.
RLS at report scope cannot be applied to reports that use business view as the data source, that is it is only supported on a query based page report.
To set up a record-level security policy for a query based page report:
 .
.
The Record Level Security Information dialog appears.
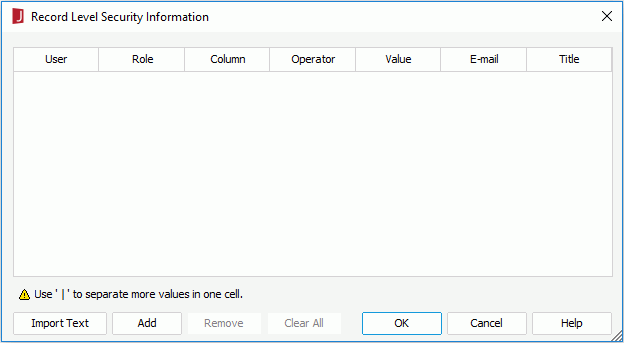
If you want to use more values in one cell, use "|" to separate them (applies to the User, E-mail, and Title cells). This is useful when you want to apply the same conditions to multiple users. For example, if you want user1, user2, and user3 to share the same security setting, input user1|user2|user3 in the User cell, and then define the security condition.
You can also create a text file, add the security settings, and then click Import Text to import the security information from the text file into the Record Level Security Information dialog. After importing, you can click the cells to further edit the security settings if required. Note that when you create the text file to include the security information, you should use TAB to separate each item, and always keep the headings (User, Role, Column, and so on) on the first line of the text file. For example,
| User | Role | Column | Operator | Value | Title | |
|---|---|---|---|---|---|---|
| admin | admin | |||||
| user1 | Customer ID | >= | 10 | user1@yoursite.com | Mr. | |
| user1 | Customer Name | = | 'Absolute Java' | |||
| user2 | Customer Name | IN | ('Absolute Java','American Coffee Inc.') | user2@yoursite.com | Miss | |
| user3 | Phone | IN | ('(212) 555-3462','(317) 555-1274') | user3@yoursite.com | Mrs. |
For example, if user1 should only see records which satisfy the condition State = 'CO' and Customer ID >= 10, you can create a formula as follows:
if ( @State == 'CO' && @"Customer ID">= 10 ) return "user1"
Then from the value list of the Function property, select the formula.
When the Record Security and Function properties have been set to control the record-level security on a report, both will take effect, and the relationship between them is logical OR.
After the report is published to JReport Server, when different users log onto the server and run it, they will only see the data they are supposed to see.
Note: In the Record Level Security Information dialog, the date values provided in the drop-down list may not be valid for your database, because they are date values that have already been reformatted using your date format settings in JReport. For detailed information on how to set the date format in JReport Designer, click here.