Previous Page Next Page
Configuring business view security in a catalog
Business view security enables report designers to limit user access to elements of the business views in a catalog. After defining users, groups and roles' permissions on the view elements, when a user accesses a report at runtime that involves the view elements, JReport checks the user, group and role of the user and merges the data in the report the user is authorized to see and displays it to the user, thus different report results can be created for different users. Business view security also applies to new reports end users create on JReport Server using the business views.
Business view security contains two parts:
Business view security, together with the security entries defined in a catalog can be exported to a security file using the File > Export Security command, which will be stored in the same location as the current catalog. The security file can be used to create dynamic security for catalogs on JReport Server (for details, refer to Dynamic Security in the JReport Server User's Guide).
To define security for the business views in a catalog, take the following steps:
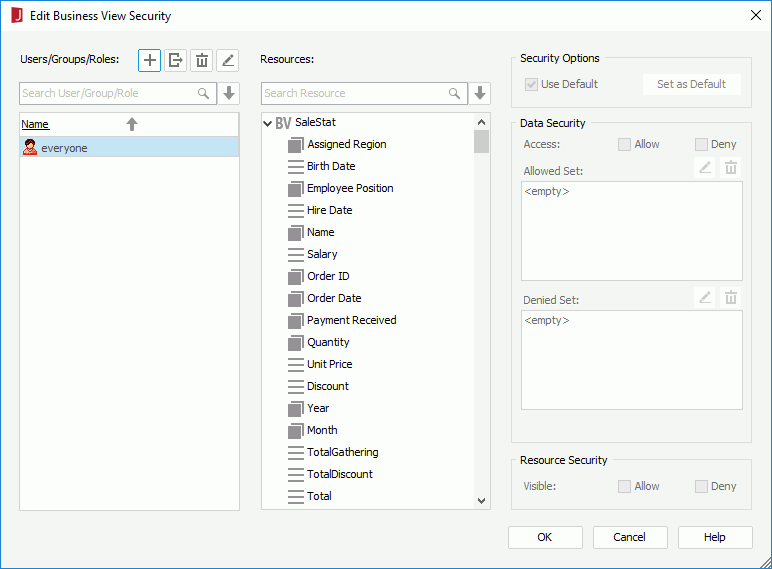
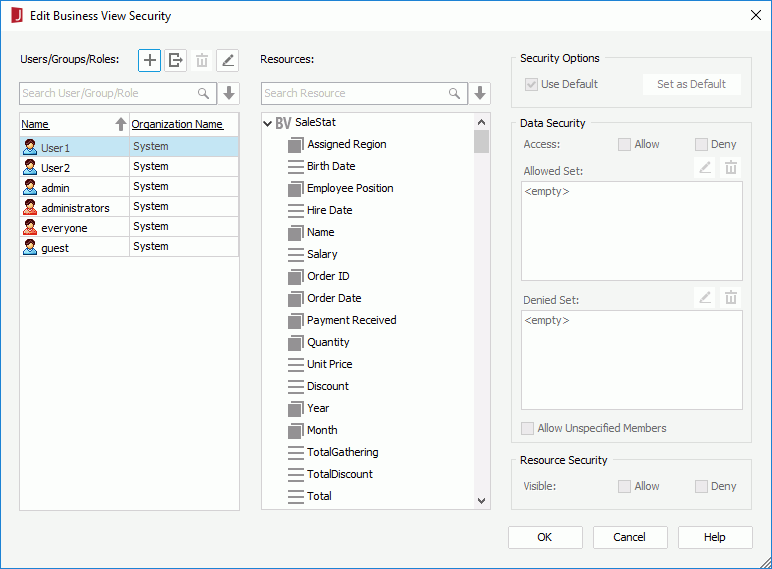
The following is a sample dialog.
 and select Import from JReport Server from the drop-down menu, then in the Connect to JReport Server dialog specify the information to connect to a started JReport Server to import users, roles, and groups from the server.
Make sure that you are an administrator user of the started JReport Server in order to perform the importing.
and select Import from JReport Server from the drop-down menu, then in the Connect to JReport Server dialog specify the information to connect to a started JReport Server to import users, roles, and groups from the server.
Make sure that you are an administrator user of the started JReport Server in order to perform the importing.
You can also click and select Add User, Add Role or Add Group from the drop-down menu to add principals manually in JReport Designer or import them from an XML file, however if you choose to add users, groups and roles via these two ways, in order to make the business view security take effect on JReport Server, the users, groups and roles should have been created in the JReport Server security system before the reports involving the business view security are published to JReport Server.
You can further edit or remove the principals in the User/Group/Role panel.
 . In the corresponding edit dialog, edit it as required. Changes to server users, roles, and groups will not take effect on JReport Server.
 .
.Notes:
 and then select the corresponding item from the drop-down menu. and select an item from the drop-down menu to select all the detail objects, group objects, aggregation objects, or categories in business views of the current catalog data source at a time.
When only one principal and one view element is selected, after you finish defining the data security and resource security, you can save the current security settings as the element's default security settings by clicking the Set as Default button.
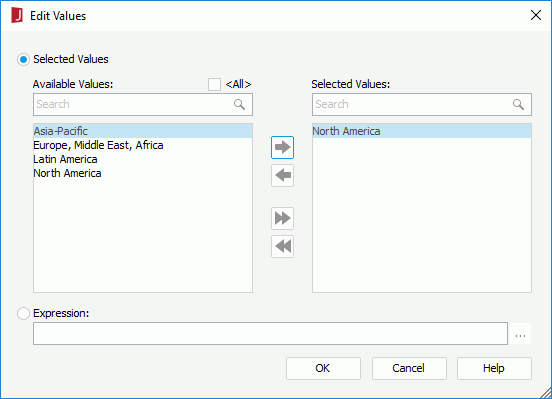
above the Allowed Set or Denied Set box. The Edit Values dialog appears.
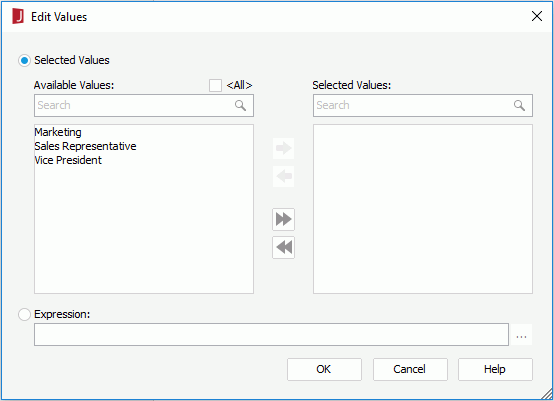
If you would like all the possible members of the group object to be selected, select <All>.
If you just want to select some of the members, leave <All> unchecked. Add them one by one by selecting one and then clicking  . You can make use of the search bar to search for the required members.
 . The Edit Conditions dialog appears.
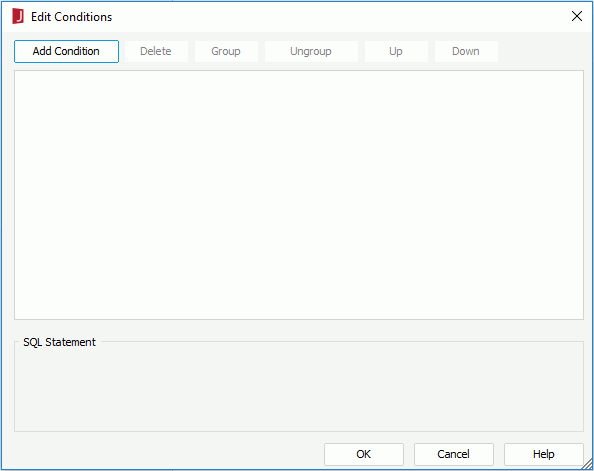
Click the Add Condition button to add a condition line. Choose the operator with which to compose the condition expression from the operator drop-down list. From the value drop-down list, specify the value of how to build the condition. You can also type in the value manually. Click Add Condition to add more condition lines and define the relationship between the condition lines.
To make some conditions grouped, select them and click the Group button, then the selected conditions will be added in one group and work as one line of filter expression. Conditions and groups together can be further grouped. To take any condition or group in a group out, select it and click Ungroup.
To adjust the priority of the conditions, select it and click the Up or Down button.
To delete a condition line, select it and click the Delete button.
See Permission logic on group objects for details about the permission logic between allowed set, denied set and unspecified members.
When you save the catalog, the permission settings are also saved and they are saved in an authorization file in the same folder as the catalog file. The catalog and authorization files have the same file name but different extensions, for example, if the catalog file is test.cat, the authorization file will be named test.auth. The authorization file is loaded by the view authorization manager of its catalog during runtime.
See also Edit Business View Security dialog for addition information about options in the dialogs.
Note: When a catalog with business view security is published to JReport Server, only the principals on the server which match the principals defined in the business view security will maintain the business view security setting. When a principal is deleted from the server security system, the related business view security setting in all catalogs will be removed.
The relationship between a principal (user, role or group) and the members of a group object in a business view are classified into three sets:
A principal can have its own allowed/denied set and inherit the allowed/denied sets from its parent roles or groups. The parent allowed/denied sets will be calculated first and it is a recursive process.
The following are the detailed working logic:
Here is the priority order:
Denied Set > Allowed Set > Inherited Denied Set > Inherited Allowed Set > Unspecified (no matter whether it is allowed or denied).
See the diagram below:
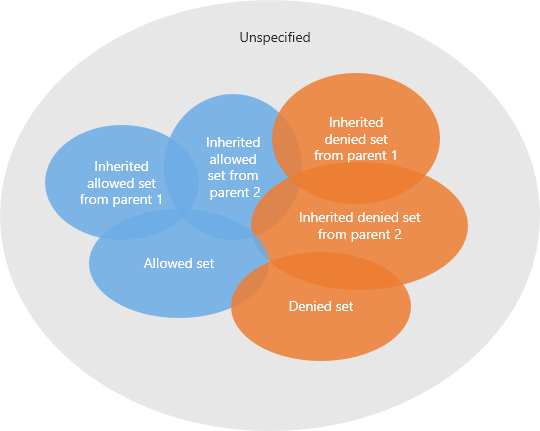
The final result of the members of a group object that a principal is allowed to access will be:
({Allowed Set} - {Denied Set}) U
(({Inherited Allowed Set from parent 1} U {Inherited Allowed Set from parent 2} U ...) - ({Inherited Denied Set from parent 1} U {Inherited Denied Set from parent 2} U ...)) U
{Unspecified if allowed}
The final set of the unspecified will be:
{All} - ({Allowed Set} U {Denied Set} U {Inherited Allowed Set from parent 1} U {Inherited Denied Set from parent 1} U {Inherited Allowed Set from parent 2} U ...)
For a user, the security in a business view would be like this:
{Accessible members of group1} And {Accessible members of group2} And...
Note: If all members are denied in a group object regardless of whether it is set to a principal directly or to the parents indirectly, no data will be retrieved from the group object to the principal.
We will take some examples to further demonstrate the relationship between a principal and the group object members.
Example 1
Here we use a simple sample to describe a case when a user belongs to multiple roles.
Assume there is a group object Order ID={1,2,3,4,5,6,7,8,9}, and we set business view security on this group object for a user (user1) and two roles (role1, role2) separately.
| Belong to | Allowed Set | Denied Set | |
|---|---|---|---|
| user1 | role1, role2 | 1 | |
| role1 | 2,3 | 4,5 | |
| role2 | 3,4,5 | 1,2 |
The unspecified members will be {1,2,3,4,5,6,7,8,9} - ({1}U{2,3}U{4,5}U{3,4,5}U{1,2}) = {6,7,8,9}.
Assume we set the property "Allow Unspecified Members" to true, which means the unspecified members {6,7,8,9} are allowed to the user.
The final result that user1 can see when only this business view security is taking effect will be:
{1} U ( ({2,3}U{3,4,5}) - ({4,5}U{1,2}) ) U {6,7,8,9}={1,3,6,7,8,9}
Example 2
This example is more complex. It contains four properties of the business view security setting.
Assume there is a summary table with three group objects and a summary.
| Region | Country | City | Summary (the count of Order_ID) |
|---|---|---|---|
| APAC | 41 | ||
| Australia | 20 | ||
| Sydney | 20 | ||
| China | 21 | ||
| Beijing | 9 | ||
| Hongkong | 4 | ||
| Shanghai | 8 |
And in below table, we list the business view security setting in the left cells, and the final results a user will get are listed in the right cells.
| Business view security specified as below | User will get such result | ||||||||||||||||||||||||||||||||
|---|---|---|---|---|---|---|---|---|---|---|---|---|---|---|---|---|---|---|---|---|---|---|---|---|---|---|---|---|---|---|---|---|---|
|
|
||||||||||||||||||||||||||||||||
|
|
||||||||||||||||||||||||||||||||
|
|
This example is based on the business view WorldWideSalesBV in the SampleReports.cat catalog file. It is assumed that the server administrator has already created two users on JReport Server: User1 and User2, with the passwords abc and xyz respectively. We will create a security policy on SampleReports.cat to limit the two users' access to different group members of WorldWideSalesBV. Before starting the example, make sure JReport Server is started.
The example contains the following tasks:
Task 1: Set security on business view groups
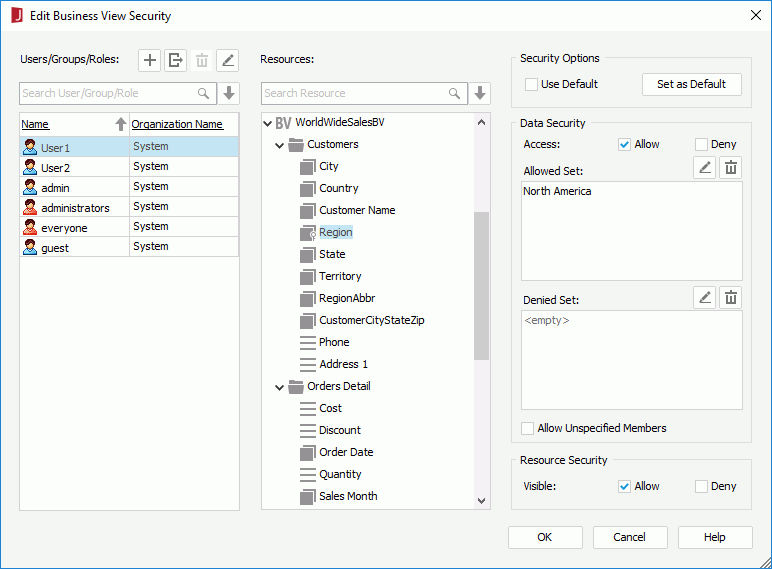
In this task, we will import the two server users to JReport Designer and limit their access to different members of the Region group in WorldWideSalesBV.
<install_root>\Demo\Reports\SampleReports.
and select Import from JReport Server.The principals created on the server will all be imported and listed in the Users/Groups/Roles box.
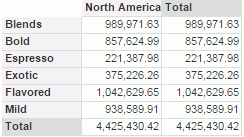
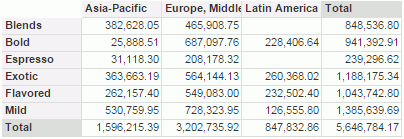
Next, we will assign field members availability to User1 and User2. We will make User1 have access on the North America region only and User2 regions other than North America.
above the Allowed Set box. to add it to the Selected Values box, then click OK to close the dialog.
above the Denied Set box., then click OK.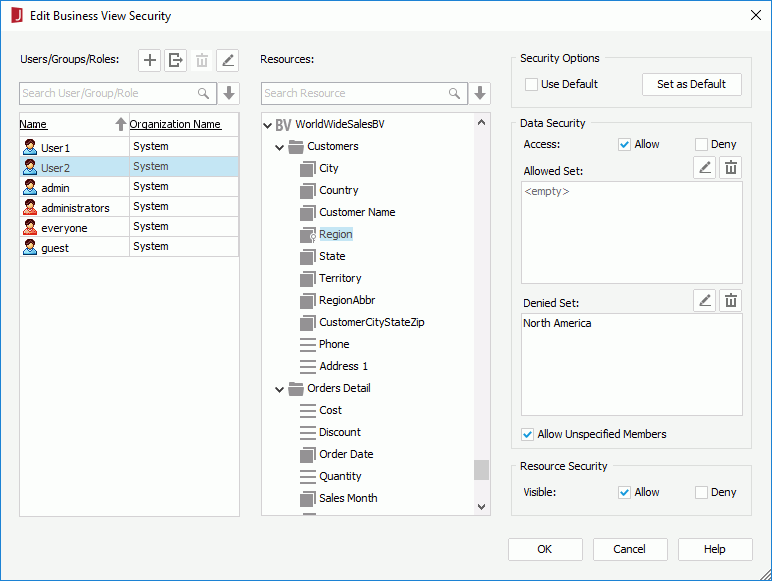
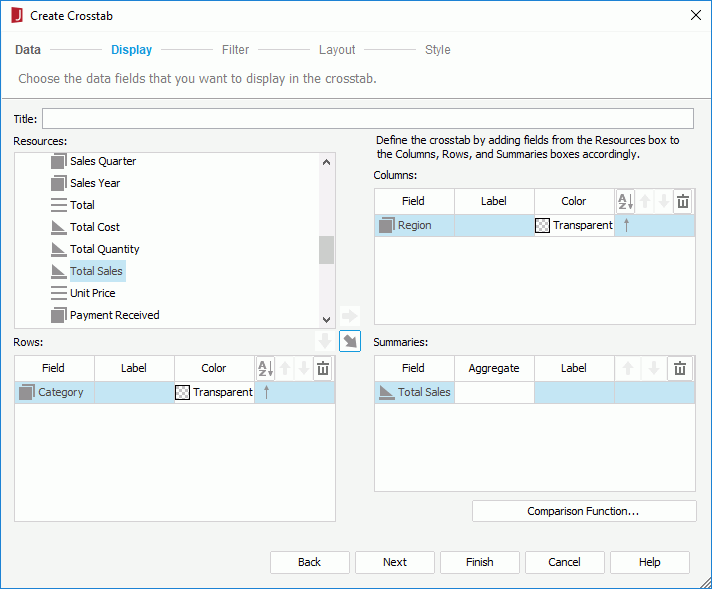
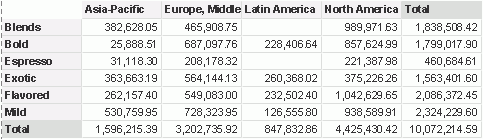
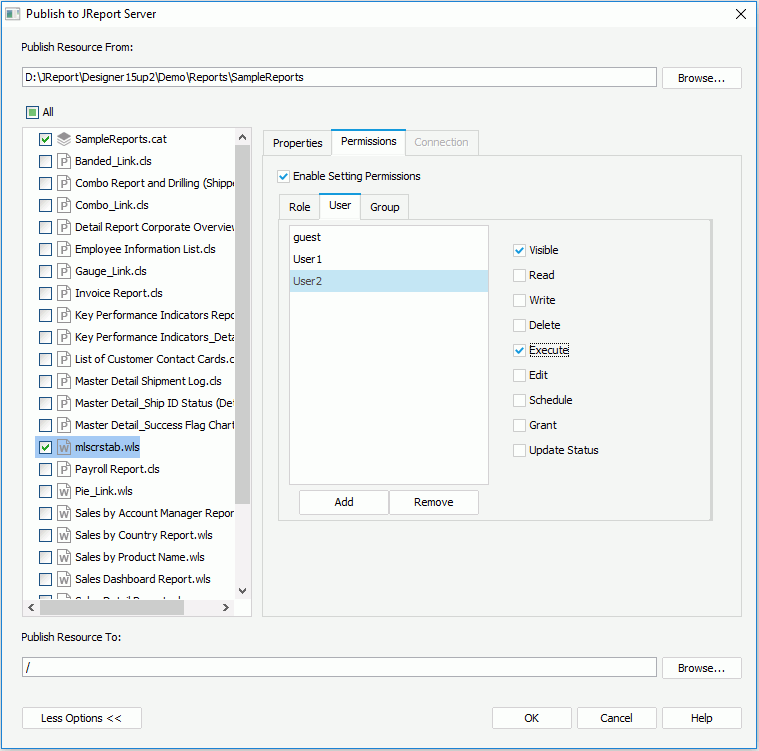
Task 2: Create a crosstab and publish it to JReport Server
In this task, we will create a crosstab using WorldWideSalesBV in the SampleReports catalog and then publish it to JReport Server.
Next, we will publish the crosstab to JReport Server.
We will grant the two users the necessary permissions on the web report, so that after the report is published to JReport Server, they are able to run them.
Now, we can log onto JReport Server as User1 and User2 separately to view the crosstab.